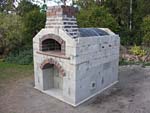
3G Masterly Tail oven design
You have arrived at the latest Masterly Tail oven design (3G MTo) building workshop. This page is the home page of the MTo ovens, or, the Rado Hand wood fired ovens.
There isn’t need for any hurry as building this oven is a worthy project for the future, practical and pleasing in so many aspect. Still some people prefer to build the oven or ovens faster to start cooking sooner. Then they play with decorations later.
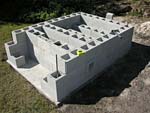
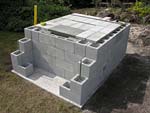
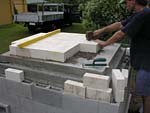
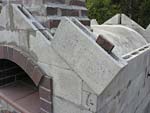
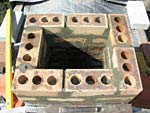
For this purpose we built one out of cement blocks. No need to apply mortar between these blocks. Just stack them dry fit then fill with concrete (same as on some water dams – it’s stronger as well as quick.)
This is a base structure with the MTo insides. From here modifications can be adapted to most client configurations and needs (e.g. different roof kind or no roof at all, low set positioning in split level grounds, etc.)
Before I built this oven I thought about it for a while. I wanted to incorporate in it things that people desired:
- Dome kits or prefabricated domes suitable structure.
- To be able to fit inside any firebrick part shape; barrel, rectangle or square kind, spherical igloo or avocado.
- For the design to be also very easily adjustable in size (just by adding in or taking off a block/brick or two from a side).
- Heavy usage (in business for instance).
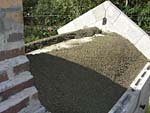
- Cold climate firing and efficiency (new double skin hood box/flue and the top hearth slab with its insulation under the slab).
- To create structurally a very compact design, not only for small backyards, just beautifully compact. It is still THE oven (it took me 1 year of testing and calculating so all fits in precisely).
- Building should not require too much measuring going around (mark lines on the concrete slab – raise walls upwards according the initial brick/block count).
- All brick, firebricks and cement block off-cut pieces as they come are returned into the structure (meaning overall less cutting, much faster and easier work, plus less material used).
- I’ve been asked on and on for how to lower costs. I share how we do this all the time.
- And of course, as with all of my designs, this one is also suitable for indoors. With the modifications of course. The exhaust vent is calculated correctly, 100% of all fumes go directly upwards into the hot air passage. Resulting in carbon-less front deco facing wall.
* Before the building, reading this saving money and time page might help/assist you heaps.
By all means, instead of concrete blocks, all the non-refractory parts on this oven can be built out of other materials. Ordinary house bricks (look at the the original MTo design if you have the disk, it’s crafted out of house bricks). Feel free to replace the blocks for bricks and create some art with them.
You can choose to use natural stones collected free outside in the nature (the natural or lime wash finish give a real great character to the oven.) Just remember to notice the size of the largest rocks you get; to add the possible difference to the ground slab – on each side. After that, all insides and general principles remain the same, except for the new material kind.
In her original fullness (I’m talking about the photographic sequence), without an angle detail missed, the whole oven building sequence contains 2783 large photographs – images #0001 to #2783
Enjoy it and then send us your oven photos when cooking.
Twelve segments this DIY wood fired oven workshop is split into:
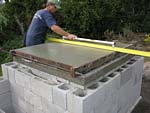
1. Ground slab making
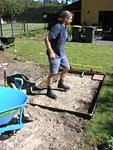

Part 1 contains 140 photos in total #’s 0001 – 0140
Enter the “ground slab making” slab making/construction process steps.
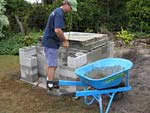
2. Raising the block walls and slick ash storage
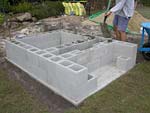
Part 2 contains 181 photos in total #’s 0141 – 0321
Enter the “block walls and slick ash storage” block walls & slick ash storage construction process steps.
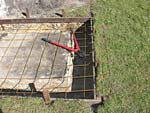
3. & 4. Hearth slab with thermal insulation under
Part 3 contains 153 photos in total #’s 0322 – 0474
Enter the “thermal hearth slab insulation” insulating hearth slab construction process steps.
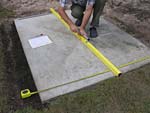
Part 4 contains 100 photos in total #’s 0475 – 0574
Enter the “hearth slab” concrete hearth slab construction process steps.
5. & 6. Firebrick oven part with hearth floor


Part 5 – firebrick floor – contains 122 photos in total #’s 0575 – 0696
Enter the smooth/flat “firebrick hearth floor” firebrick hearth floor construction process steps.
Part 6 contains 613 photos in total #’s 0697 – 1309 (split into 3 pages)
Enter the MTo design “firebrick oven part” pages: “1” – “2” – “3” refractory construction process steps.
7. Concrete cladding application

Part 7 contains 121 photos in total #’s 1310 – 1430
Enter the “concrete cladding application” cladding layer step by step.
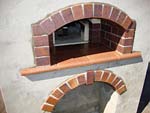
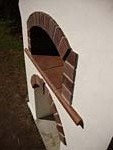
8. Front decorative arch, flat pot surface and ash slot
Part 8 contains 431 photos in total #’s 1431 – 1861
Enter the “lower decorative arch and ash slot” decorative arch and flat pot resting surface with ash storage behind.
9. Entry deco arch with hot air hood (vent, flue box)

Part 9 contains 335 photos in total #’s 1862 – 2196
Enter the “entrance arch with hot air vent and hot-air passage” step by step to make flue hood with hot-air passage and entry arch.
10. Enclosing the oven part with walls
Part 10 contains 230 photos in total #’s 2197 – 2426
Enter the “oven part walls enclosure” construction process A to Z steps.
Structural stages below
I must wait with adding pages for these following building stages (from this level below), still, they are easy to do or they involve only the final cosmetic matters. Reason, just this page gets traffic of 7000+ (seven thousand plus) unique visitors daily. Which is a real good load on the server’s CPU load. As soon as this website’s current hosting is upgraded to a full server (more delicate/classy though) I will complete & post rest of the following web-pages into place permanently. I appreciate the understanding. We try to keep all costs low, not only costs related to masonry. However, 100% of them all are included for easy download or are being shipped on DVD disks to people (thank you all for the valuable support thus far.)
11. Chimney
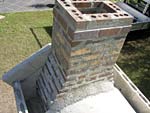
Part 11 contains 58 photos in total #’s 2427 – 2484
Enter the “chimney building” page for details of the construction process steps.
12. Insulation around and on top of the oven
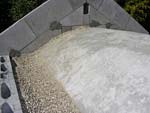
Part 12 contains 77 photos in total #’s 2485 – 2561
Enter the “oven insulation” application page for details of the construction process steps.
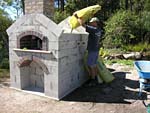
13. Roof
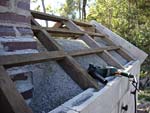
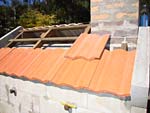
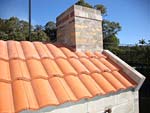
Part 13 contains 118 photos in total #’s 2562 – 2679
Enter the “roof making” page for details of the construction process steps.
14. Rendering – painting and miscellaneous
Part 14 contains 33 photos in total #’s 2680 – 2712
Enter the “rendering and painting” page for details of the construction process steps.
15. There is also miscellaneous matters section
Part 15 contains 71 photos in total #’s 2713 – 2783
Enter the “miscellaneous matters” page for details of the construction process steps.
Look at the pointers down the bottom of each page as there might be a few.
Here is the web version of the 3rd Generation Masterly Tail oven design (disk & download building plan full versions are being sent out to people every day.)
Respond to the 3G Masterly Tail oven design article:
66 Comments - post your thoughts
Leave a comment
You must be logged in to post a comment.
This looks great–can’t wait to see all the details. Dry stacking the concrete blocks looks like something a complete novice can have success with.
Thanks!
By Irv
looks great
can’t wait to see the whole series
this is more suited to what I want
By Rich Garlaus
Looks great! I like the stream lined construction.
What are the rail road spikes that are on the side going to be used for?
By joe
I love the new design. Is the complete package going to be able to be downloaded like what is on the disc I bought or are we able to purchase a disc with all the pictures?
By Peter
Rado, The oven looks wonderful. I am sure interested in the details. I have been looking heavily into the Alan Scott style of oven. I see some similarities that I want to incorporate into my oven. Just wondering about the importance of using the calcium Aluminate cladding like Mr. Scott preaches. I am wondering about what you think about using type N Portland cement for the cladding? What type of temperatures can type N withstand withstand?
Thanks for all your work and instruction. Keep up the great work!
Mark
By Mark
Mr. Hand,
Thank you so much! I’m excited to dig into the resources you’ve provided. About 9 years ago, my brother and I were inspired to build a wood-fired oven on our parents property. We have long been avid chefs and enjoy baking naturally leavened breads. In our initial planning, we checked out books from the library (the usual suspects), bought Russell Jeavons book, and scoured the internet for tips, ideas, and pictures. Your site was one of our most favorite. We eventually stumbled upon a series of meticulous photos taken by a couple who had attended an Alan Scott oven building workshop. Taking all of these resources into consideration and thinking about our needs, we planned and built our oven with the goal of completing it before my wedding (to bake bread for the reception). Building the oven was a fantastic and richly rewarding journey. The oven was completed just in time to have it’s first bake and pizzas the night before my wedding. Fast forward to the present. I am a 14 year career teacher and instructional designer helping teachers learn how to integrate technology into their teaching practice. I bake profusely on the weekends often sharing with neighbors, co-workers, and friends. I am planning to build an oven in our back yard that I could use for both personal use and small commercial use (farmers markets, events, etc.). We live in Nashville, TN and the cottage laws allow me some freedom to market from the home. After enjoying your web page for years, I’m happy to contribute and use your plans in aiding the design of me new oven. I’ll keep you updated. Thanks so much.
P.S. – A quick question. I have downloaded the links onto my Mac because our desktop is getting older and in need of replacement. I am going to back up these zip files, but wanted to know if it was possible to download it on my desktop as well. If not, I understand and will just be extra vigilant in making a backup. I’m extremely interested in your latest Masterly Tail oven!
Sincerely,
Jason
By Jason
Hello Jason,
Thank you for your nice words! Ahh, they made me think now, you mentioned that it was 9 years ago; you built your 1st WFO with your brother, completed it just in time for baking breads for your wedding reception, and those years ago you also used TO website for some of the information you both needed for building the oven. Looking at it from the perspective that TO website was there already that time, those years ago plus even longer … it’s like a historical story to show. I never thought of it from such perspective. Time flies.
The best is to enjoy every day. Every day is the best day ever!
Do you have a memory stick (also called flash drive or memory pen, etc.) you could simply stick it into one USB port on your Mac computer and copy the zip files into the connected/external memory. Don’t worry, they will not get deleted just accidentally … I am also a very cautious person when it comes to complete safety of things close to my heart, and hearth, (you would need to agree with it first – twice to move them into a recycle-bin – then a 3rd time to empty them from there, while being prompted again which would be the 4th time prompt for deletion.) After that, from this mobile memory, you can transfer all files into your new Desktop computer or a laptop when suitable. The files are compatible for Mac’s and Desktop’s or even Linux computers. I have heard people use them also on Google’s Nexus 7 (Android system) so I bought one Nexus 7 for myself – it is one excellent tablet device to have both for business and also for a personal use! Obviously not just for book reading or listening.
With compliments.
Good vibes,
Rado
By Rado
Hi guys. Thank you for the notes. Please try the same on the individual pages as they get published, in a sense of making descriptions for various image numbers.
@Irv – yes like with Lego except the blocks are heavier.
@Rich – I am glad it suits you. Adding another part of the series now.
@Joe – thank you Mate. Which “rail road spikes” do you mean? On which image number?
@Peter – thanks Mate! Yes there will be also the disk option with large photo sequence and plus download version for each of the designs. It will be available but give me more time. First this web version.
@Mark – On the outside the looks simple, but as it seems many people look specifically just for that. The oven performs real well. Calcium Aluminate cement or other refractory cements can be used of course, or even refractory castables. All those are for high heat/cone applications for hot face for instance (direct contact with the heat 2-3 times higher than the heat from wood fire). They can be used either for the hearth concrete slab or for the cladding. But we use clay firebricks for the hot face. I use Portland cement with lime mixed in – one part Portland one part lime mixing ratio. Also plaster could be used instead of the lime (you can heat plaster to red hot and after it cools down it will look nearly the same). Study show that as is Portland cement can be pushed into temperature range 350 – 450 °Celsius = 662 – 842 degrees Fahrenheit. The lime content on the concrete mix improves it further. I remember that with Scott some people did add powdered fireclay into Portland based concrete to improve its properties. But I think it isn’t worth the effort to be adding clay as to my knowledge clay/mud only contaminates the cement chemistry. You would have asked this question in the cladding page if it was already in place (heh which isn’t finished yet – at this point of time but it will be there soon.)
@Robert – thank you! Which link didn’t you phone open? The one in the newsletter email I sent out to people from my aweber acc.?
@Rolland – yes, as soon as all the pictures are here I will post the material list as well. All dockets sit on my table for the smallest details are included. Also slab and wall dimensions if different cement block sizes were used globally.
By Rado
@Joe – In #2651 you are seeing pegs for convenient hanging of tools such as: cleaning brush with a hanging loop, ash poker, possibly your pizza paddle, a soft cradle for carrying firewood to the oven, etc.
You can see pegs in use HERE, on another MTo. – I see a long brush and other tools.
@Rado – I love the first set, Slab Pouring, all on its own. It’ll help me with my concrete pad that I need for two big rain barrels. Finally some instructions that will work on my soft clay Texas ground.
I’ll be leaving other comments in the right places. And marking out a spot for my own Masterly oven…
Rick
By Rick Op
Rick,
Thanks for working that out! We got recycled old railway sleepers, a great texture in that hard wood, for the outside furniture as in the Original MTo disk – look at it – the two outdoor tables were less than 20 bucks. These sleepers had the old iron pins and bolts in them. Obviously I kept them all for these reasons.
If you like the slab sequence, I am glad; posting now the block walls into the hip level height – it contains 89 resized images covering the stage. Then insulation with top slab, followed by firebrick part, cladding as mentioned above.
By Rado
Hey Rado, well first of all I just want to say that your website is great and I really appreciate the work and commitment you’ve done to wise up the rest of us on how to do such a cool project. I’m all over it, as soon as I finish my current project. Anyway, your new 3rd generation oven is really what I need for my size yard. But I’ve been looking around for the dimensions for the slab. Are they there somewhere?
Thanks again, Mike
By Mike Tyrrell
Hi Rado,
Just another question for you. I notice the some differences between the 3G and earlier ovens. In the past you have suspended the hearth, but on your 3G you have supported the hearth. What is the thought or reasoning behind the change?
Mark
By Mark
@ Mike – Thanks for your nice word about my work. What is your current project you’ve mentioned?
@Mark – This way the hearth slab with the whole oven are completely/nicely wrapped in the insulation layer (are effectively isolated from the outside cold environment by the thermal layer.) So the heat retained in the dense part is protected even better.
More on this:
The slab, and insulation layer under, in 3G MTo are poured on a stable surface which can be made from these cement block-capping tiles or any other material like pavers or even house bricks and all sorts of plates. These are like a smaller fragments that can move either way on possible expansion. They are very easily placed in place even without being skilled. (this 4″ insulation layer can be poured also on already existing slabs, people ask about this very often – then the dense hearth slab gets poured on top – and after firebricks are laid for the oven’s floor). The whole dense part of the oven, which includes the hearth slab, is nicely/literally wrapped in insulation. The insulation layer is 2″ – 50mm thicker and the top hearth slab doesn’t have to be reinforced as before. Plus, this way it is quicker and easier to build and also best structurally for cold climates or for efficient cooking. Although for extra efficiency the insulation application over the top of the oven is priority, always. More points are mentioned in the text bullets on the top of this page.
By Rado
This looks to be a very good design and I would like to try it so when you have the CD ready I am going to purchase it thank you for remembering me.
By Daniel Silvaggi
Hi Daniel,
Thank you for your nice words and for your support.
Even though this web version is pretty large (so I think) the full version (larger by ~4 times + on image count), with comfortable-large size images where clear details can be viewed from a sofa – for Internet download or on CD’s sent by traditional mail service, is going to come. After these web-pages are all there, not many more to go.
If you haven’t yet, sign for our newsletter, there will be updates for 3g MTo.
By Rado
Hey Rado, well the project I’m doing now, before the oven is built, is a retaining wall built out of interlocking blocks. Behind the wall will be terraces and some trellis work. To the side of that is where the oven will go. I am building all this into a slope. A question for you or anyone else is whether or not the blocks which will contact the soil behind the oven should be treated with something, keeping in mind that I won’t be able to access the back of the block structure. Thanks
By Mike Tyrrell
I purchased your first CD a couple of years ago and am on your newsletter list. I finally decided to build when I saw your 3G Masterly Tail design. Glad I waited. I’ve poured the slab and am laying the cement blocks based on the limited photos. Eager to purchase new CD when available. Do you have a target date for new CD?
Best regards, Dean.
By Dean Foote
Hi Dean,
I’ve got the whole building sequence done already. All large images and all of them are in. I am about to save the zip file for downloads, just like the original MTo oven design and the Swishy oven are being downloaded. Identical version on disks will be airmailed if required. Practically I will send/save the file for downloads on Monday; I am hoping it will go fine as the mobile Internet I have here currently is not too fast when compared with what I have at home. The upload way (for this) is even slower.
* Do you prefer to receive it on the cd again, or by download, because this bigger version has the full photo sequence, OR, because the photos are large meaning more details can be seen more clearly? Or because of both? Just curious.
By Rado
Thanks for the quick response. I like to have it both ways. Download because it will get here faster and by CD should my old computer crashed and I lose everything on it. With the CD , I’ll have something to fall back on. I’m 73 years “young” and not too good with the computer. I have to rely on my grandkids most of the time on computer issues and they aren’t always available. If one of them visit today I’ll send $$$ by Paypal. Thanks for sharing your expertise and knowledge. Dean Foote, Gainesville, Georgia.
By Dean Foote
Rado:
I am nearing completions of my oven based largely on the MTO design…Made a few variations…found some Kiln bricks (Yukon Green) for the dome, (they were a bit larger than the used fire brick I purchased when I started this last year), and used some dense white hard bricks for the sidewall and floor. (they also came from a kiln).
As I was thinking about cladding, I looked at over 150 of my original bricks, thought about lugging lots of bags of concrete…and like you said it is all for better thermal mass. I simply laid a double layer for the dome…using the Yukon bricks, for the inner layer, and then put a layer of tinfoil over the dome, and laid the white bricks on the side on top of them…
However I am concerned about the white brick have been outside for several years (here in rainy Seattle) and do feel a bit damp…so before I cap these off my insulation, I was going to build a small charcoal fire to sort of dry everything out.
Do you have any advise on the 1st time you fire one of these as to the temperature you should bring it up to and duration?
2nd question, because of the location I cannot bring the exhaust straight up, but will come up to the top of the dome then make a tunnel about about 4″ X 8″ 1 meter long then go vertical for about 1.5 meters…Do you foresee any problems with this approach?
Thanks for the great discs…(had to order twice as I lost my 1st on over the winter)
added by Rado:
Hi Bob,
I am sorry to hear that your first disk got misplaced! It happens to me too, mainly with material.
1. Yes if you soak a bit of heat from small drying fire, or from a few small drying fires, through these bricks it will make them fully dry. Start with a moderate 15 minutes long fire. If you won’t see any water drops right around the entrance to the oven then you can extend it to 25 minutes. If the structure is still wet some condensed water drops will appear. After this leave the oven to cool down. Next day, or in the afternoon, build another drying fire, this time slightly larger. Two or three fires will dry the bricks out. Are you applying also concrete cladding? If you do, you can do so when the bricks are still slightly warm/expanded.
2. Even though the horizontal tunnel will be only 1 meter long (did I just witnessed person from USA talking Metric! ;-), to move 100% of all the fumes without draft through where they should go, the 4″ X 8″ size seem quite small. The vertical pipe at the back would need to be much longer, like a chimney, so it creates strong draft. Because it is a horizontal hot air passage the channel gets very hot as well so wrapping it in thermal insulation will be wise.
Without introducing draft; instead of 4″ X 8″ I would go for 8″ x 1′ or even better 10″ x 1 1/2′ to be safe. I know it might seem too large on a first thought but in fact it isn’t. That channel, because it’s horizontal, will need some opening on either side for cleaning – it won’t need to be cleaned often – still good to check it inside from time to time.
By Bob Kelley
Hi Rado
Am I correct that the 3gmto plans are available for download?
That would be great! I have started my oven based on the limited photos from your mailing list. Can’t wait to get the whole package.
If so I will send a donation thru paypal.
Thanks
Rich
added by Rado:
Hi Rich,
Yes correct, all designs are available by download now. Download versions/workshops are exactly identical to disk versions (in the content and in file size.) As it appears 99% of builders choose download option, so it is preferred, more practical. You just unzip it and then the folders are on your computer (even though it is straight forward matter, how to do all that can be found in a confirmation email I send out to builders personally.) Thanks fro the note Mate.
By Rich Garlaus
Hello Rado
WOW much improved web site. Love all the added information. Keep up the good work.
I purchased your CD 3 years ago or so and right after getting started started my fight with cancer. Good news now have been cancer free for 2 years and getting started again on finishing the MT oven I started. After discovering that our fire bricks over here are only 2.25 inches thick (just like all other building materials here finished smaller and charge more for LOL) I have had to figure out how to adapt and over come the differences. I am making head way and will get through it all with the help of your great pictorial CD. I do have a couple of questions and that is is there a necessary length for the tunnel going into the oven. And is there a minimum size for a chimney?
Love all the helpful hints you give.
Bob
added by Rado :
G’day Robert,
In this article page I answered the chimney and flue questions. Please let me know in there whether the answers are complete also for you.
By Robert
Hi Rado! How do I find the downloadable zip-files for the 3gmto oven building plans? Do you email the link after a donation is made ? Or how does it work? Also, is the measures for the ground-base same as in the one showed on your CD ?
Happy holidays!
added by Rado :
Hi Martin,
Yes you will receive three links in a confirmation email I send out, for all 3 designs and all information.
By Martin
Thanks so much for the DVD and great info!
I’m trying to figure out the size of the opening for the 3G. Not the oven door, but the width and height of the arches under the chimney.
Is there a rule regarding ratios to the oven opening size that should be followed.
added by Rado :
Hi Philip,
In this article page I answered some size questions. Please let me know in there whether the answers you need are complete.
By Philip
Got your plans a few years ago. Finally layed the slab today and am keen to get to work on your new new MTo oven design. Prefer the download option instead of waiting for mail to arrive, thanks.
By Simon
Dear Rado,
I’m about to begin building the oven based on the plans you sent.
Can I get your confirmation regarding on which parts of the oven to use the insulating material. We couldn’t find vermiculite but the supplier said that “Insulating Castable” is a good substitute. Can we request you to write down your comments directly on the sketches attached and email it back to me?
Thank you very much!
By Jac
Dear Jac,
The sketches are upside down, but I can turn my Android tablet around, I cannot now take the image down and insert text on it with the device I am using here, or at least I don’t know how.
Looking at the pdf file now.
What is the mass density of the insulating castable after setting, do you know?
Basically it is best to pour loose matter between the oven dense cooking part and the boxing walls. Can you get fly-ash? You could use it instead of Vermiculite or Perlite.
Then on top of the oven you can of course pour the mixed castable, always the thicker layer of the insulation the better.
If you pour castable into the gap space, between the walls and the oven, chances will be that because it is still solid insulation (even-though it isn’t hard as mortar), as the oven expands, it will push onto the decorative walls and you don’t want that. So if you can pour dry-loose insulation of a kind into the gap around it’s the best. Or also insulating fiber blanket or high temperature insulation Kaowool can be placed in there, these are Thermal Ceramics.
By Rado
Thank you so much.
By Jac
Rado, I built the MTO about 4 years ago and it worked perfectly even in the dead of winter. I’ve moved and was unable to take it with me. I’m going to build another one at my new home. My question is, what is the benefit “if any” of pouring the hearth slab on top of the insulation instead of pouring it around the insulation as in your original MTO plan.
Regards
Mark
By Mark Silvestro
Hi Mark,
thanks for emailing the photo, I will add it into the gallery. I very much like the snow on the oven.
Basically this new design, or approach with the top slab plus the rest of other features, answers all applications / scenario varieties one can come across with — Eg. people often build on already existing slabs, split level or elevated grounds or on steel fabricated structures stable or moving platforms like trailers (for moving the ovens to different locations for example) – and here this designs fits all such applications.
However, not only what I mentioned here above, due to the additional/extra 2″ – 50mm in the insulation layer thickness on top and the other structural aspects, doing the bottom layers in this way also suits cold climates. The oven retains the heat then uses it efficiently. Adopt this design for building production ovens for business, both the insulation and the dense slabs as they are worked-out into the structure sit on already firm surface. Therefore no extensive reinforcing is required. One designs suits the lot. On heat expansion the surfaces can nicely/freely move plus the dense slab isn’t affected by heat-differences-in-material. Not to mention the important aspect, which is easier plus fast to make it this way and build it better.
By Rado
I have a question; once the concrete cladding is done over all the fire brick it seems to me you could use metal framing and exterior gyp for the sides, back, and roof. You could then fill the wall cavities with vermiculite. This would give you aprox 8″ of insulation which would only help to hold more heat longer inside the oven. Am I thinking correctly?
Jeff
By Jeff Kinniburgh
Hi Jeff,
Definitely yes. Thank you for bringing this perspective up.
The cement block walls above the hip level whose are boxing in the oven part are much thicker, nearly 4 inches – 10cm, when compared with a much thinner gyp or other such suitable material. Also corrugated roofing iron sheets work well (new cut to size or reused cut to size with hand held scissors – cutter). As you said, when you use a thinner boxing material attached to a metal frame you may end up with wider space between the oven pat and the walls. Hence creating by that more volume-space for the insulating material thickness in sides and at the back. Or, this approach can be practical for those builders who do not have enough total foot print, space-room for building, as this way ~ 7-1/2″ – 190mm could be effectively saved on the total width while still keeping THE SAME internal dimensions for culinary practices.
By Rado
Hey Rado,
I’ve built my oven.
It’s not on wheels. But I put in lifting points so it can be lifted and then moved. I beefed up the hearth slab with welded 1″ re-bar.
It should work…
I just finished the concrete cladding. It’s about 4″ thick over the firebrick dome.
How long does it need to cure before I can have my first burn?
Thanks,
Alex
By Alex
Hi Alex,
Mate send us photos of your oven!
If it’s nice summer weather then leave 5-6 days but, before firing to full heat up for cooking, run a few small fires to remove all water from the structure. Start gradually; Two or three 15 to 30 minutes long fires per day, with pause between each, simply to soak gently heat through the dense part. At the beginning some water drops will be noticeable, condensation, forming just around the outlet/flue area. When these stop appearing, then you can heat up to carbon burn off. It is easy logic. BUT, insulate the oven on the outside well before heating up so there’s no temperature differences in the material, between the inside hot face and outside surfaces. More details on insulation or on firing is around this website.
By Rado
Hi, Rado!
I have purchased your CD a few years ago, now. Being unable to build at that time, due to work commitments, I’m now re-visiting the project.
I have acquired a large LPG cylinder, 1100mm long and 750 mm diameter. The steel is at least 7mm thick.
My plan is to cut it in half, thus ending up with an elongated dome.
I’m intending to use your base and firebrick floor and place the 1/2 cylinder on the floor.
My plan is then to use either solid Canberra Red bricks, or, your suggestion of “Midlands cream color solid bricks produced in WA” to cover this dome two layers deep, which should retain and re-radiate the heat through the steel dome, into the oven space.
I am then going to continue with your plan for the rest.
I would value your views on the above variation.
I have some pictures from the Cylinder. Unfortunately I’m not “computer tech savvy enough to upload them.
Awaiting your comment,
Joe from Canberra
By Joe
Hi Joe,
Yes sounds fine. Do you know what steel grade group that is the cylinder was manufactured from? Probably the code 4x = heat resistant steel type groups.
The heavier the solid bricks on top of the steel cylinder the better. Then insulate the dense part with thermal insulating layer on top and sides for efficiency. More insulating layer the better. It’s good that you are going to keep firebrick hearth, floor, because firebricks absorb the steam which gets produced when the fresh dough is placed on. For instance a fabricated steel plate floor wouldn’t absorb the steam. I would like to see the steel cylinder if you could manage email some photos (the images can be of the original large file size as they automatically come out from a digital camera. Just attach them when sending me your email. It’s easy :-)
By Rado
Rado,
I have a bunch of old fire bricks from a chimney built in the 1950’s. Can I and should I use these in making my 3G MTO?
By John
Hi John,
Most probably you could use them for building. What was the chimney attached to, so,e furnace? If it wasn’t anything of toxic nature then why not. Could you cut or break one of these firebricks in half? Then wash the cut size with water and make a nice sharp close up photo of the brick body inside and email it to me. In case; I will have a look at it if the clay is not burnt (with some low quality bricks, non-firebricks, if sometimes happens – basically you would notice some burnt dark carbonization inside in the center where a cheaper clay can be hidden. It is rare though but it does happen sometimes.)
By Rado
Hi Rado
I purchased your plans. I want to build the 3G MTo with block and have brick on the outside. I’m having trouble figuring out how to do that in the front. Can you give me some suggestions?
Thanks
Jim
By Jim Henrichsen
Hi Jim,
Sure, good thinking, there can be several ways. You mentioned you plan to have it built with blocks and have house bricks on the outside. The whole outside covered with brick completely and all around?
You can do this with this new MTo oven design because all its outer walls are perfectly fixed. Meaning, bricks can be bonded onto this block work.
Very often this is done also with stones, mortaring natural field stones on, instead of bricks. Or combination of bricks, stones (or even a various chunky iron pieces or colored glass bottles I have seen already.)
Basically; the oven can be built exactly as is and after that it is covered with laying bricks with mortar around it (or by gradual rising walls with both the blocks and bricks beside at once.) You will need to add the extra brick size measurement to the ground slab dimensions however, at each side, for the extra space they take on this surface.
Another option is, to use bricks with mortar only and build the whole structure from bricks only. The inner part can remain be made from the concrete blocks or also those can be replaced with house bricks.
Let us know your thoughts!
( Show me a person who doesn’t enjoy decorating with bricks, or with stones and masonry mortar? Or with cement blocks with a bit of rough render or stucco layer … )
By Rado
Rado, how many (Total) 8″ X 8″ X 16″ Concrete Blocks do you use to create the 3GMTo Oven complete?
Thanks,
Steve
By Steve
Hi Rado,
Love the site!
Might have to donate again so I can get the 3G plans.
I have a question. I want to build my oven to be level with my deck. The foundation would be approximately 1.2m below that level. Do you think it would be just a matter of building taller walls, or does this become dangerous? Further, I still want the front arch/wood storage area. Would you recommend building a second concrete slab at deck level supported by the original slab and walls?
Hope that makes sense.
Thanks!
By Michael
Rado,
Thanks for such a wealth of information. I have properly browsed the three plans and I am going to settle on the 3G Masterly, with a few modifications to accommodate a smoker in the same structure. I’ll forward along arch drawings when I get them done and scanned.
I’ve got a couple of preliminary questions related to needed material. First, are you using the Portland cement when filling the block wall cavities? If so, do you see any harm in using lower cost Quickcrete type cement for filling the block wall cavities? It is about half the cost of Portland.
Second question is about concrete quantity. I will be pouring a large slab of concrete to accommodate an outdoor kitchen, of which the wood fired stove will be a part, ~ 20′ x 20′ ( ~ 6 x 6 m ) ( should I have to consider the possibility of putting in an expansion joint(s) in the pad, which I hope not to have to do? ). How many concrete bags do you need for filling walls, pouring oven slab and cladding the oven?
Third question, I picked up a couple of tons of Montana Flagstone ( here is a picture of some of the flagstone ) that I got on year end clearance for a 60% discount. The material is 1 1/2 – 2″ in thickness and I would like to face the block walls of the oven and my outdoor kitchen with them. Given this thickness, I don’t know if I need any extra support for the block walls to carry the weight. I don’t think so but the only stupid question is the question not asked. :)
Fourth question is in regards to the modifications to accommodate the smoker. I would like to raise the oven up, not sure by how much yet, to accommodate the smoker. If I were to make a 30″ x 30″ ( 76 x 76 cm ) smoking chamber underneath the oven raised at least 12″ above ground level that would only elevate the oven door by about an 10″ which would probably put the floor of the oven up around 52″, which would be fine by me because I am about 6 1/2 ft tall. I will also need a fire chamber for the smoker. That is what would really push the height of the oven door up were I to orient it underneath the smoker. I would need at least 24″ in height plus however tall I would make the floor of the firing chamber. If I were to locate it underneath the smoking chamber it would put the floor of the oven up to around 76″ or higher, which isn’t realistic so I will have to offset it. I’m struggling whether I should use fire brick to line the smoking chamber. I love the ability to retain heat in them but with smoking meats, low and slow is the name of the game. The ability to keep it around 225 deg. is key. I’m afraid that if I use fire brick it will be easy to get it too hot. Would you be able to offer an opinion? Also if I do put the smoking chamber underneath the oven I would have to suspend the floor over the void of the smoker. In the 3G design there are two rows of block supporting the floor. What would be a good way to suspend the floor over the void? Metal C-Channel anchored into the block walls, thicker floor with more rebar?
OK, that is it for the questions for right now. I am sure I will have plenty more as I work my way through the process. My target completion date is June 1 which gives me plenty of weekend time to work on it.
Thanks for all your help.
By John Sheppard
Hi John,
Welcome! I will wait for those arch drawings and comment about them once they are ready for me to look at.
I used Portland cement in all parts, for mixing concrete and for making masonry mortar. The concrete for filling these block walls I manually mix on the job, it consists of concrete blend (stones with sand) and Portland cement. The mixing ratio is 4:1 in volume, 4 shovels + 1 shovel. The same strength of concrete goes for the ground slab plus for the footings around the slab perimeter. What is written on these Quickcrete bags, is it being used for example also for making footpaths or similar purposes? Do the directions say anything about the strength of the mix? I do not see any reason why this Quickcrete couldn’t be used in there to take advantage of some lower costs. Plus, as these blocks are dry-stack with no connecting mortar or glue the walls become even stronger. Or is it a weaker material e.g. just for concreting posts in the ground or for patching up some holes?
OK a larger ~ 20′ x 20′ ( ~ 6 x 6 m ) slab; One expansion joint on the outside 2 inches by the oven wall (above and away on the outside edge from its normal reinforced footing) would be practical. Even though the oven is standing on quite a very little surface area, it is still heavy. BUT surely also, if you want to avoid making this expansion joint for instance for cosmetic reasons (or not cutting the shallow control joint grooves while the pad is still wet) in case the ground shifted, not to see there no such crossing lines, you can simply strengthen the slab under by making deeper reinforced footings with lengths taken across the full slab length. That won’t absorb too much resources considering the practical side of things of having such a slab size in disposition. For the whole job as is, I buy and have delivered exactly 2 cubic meters of concrete blend = 2.6 cubic yards. This is the total volume amount of the blend required (add one 5th for the cement part, also in volume sense, for mixing the concrete.) I get 1 small wheelbarrow of this blend always left-over. So simply add to this the extra amount the larger slab takes.
Ah, that is beautiful flag stone! I used the very same, we call it slate, for around a pool here (I am in that place right now, I truly enjoyed fiddling with the unique sizes to fit them nicely next to each other.) BUT I remember we didn’t get that 60% discount! This MTo oven is designed the way that the walls do not move at all. The block walls are very strong, you will not need any additional support to cover them with this flagstone. Just buy a good glue so they hold properly under weather conditions.
Have you noticed this cold smoker system? It is very smart. Smoke is channeled into the oven through the ash slot opening. Exactly, “low and slow is the name of the game”, I couldn’t agree more, delicious gourmet! First of all you do not want to create the fire hot when smoking (unless the fire was on the floor in the middle of a spacious room, and even then the fire would still be very small, it only makes smoke, no more / no flames. No chance for the firebrick lining to get too hot, also, the smoking source can be placed in an old metal pot too, lifted from the ground. I know someone who converted an old small house on a property into one cold smoker house and this persons smokes basically commercially for many people who bring their meats to him for weeks; it is so to speak a high class service, he has his smoke-house always full and busy.)
You can lift the oven higher no problem with that at all. If you went higher, you can always step up the ground around the front of the oven. See the stepped up area in the front of the original MTo oven, it had to be done that way due to the different ground level of the whole area. That step there just made the oven as well as the the whole surround better looking.
Basically those free placed capping tiles, on whose the 4″ – 100 mm high/thick insulating layer is placed, sit on something solid and that’s the logic for this section. Structurally this could be some beams as well. Or a slab underneath, whilst all the space under would then become opened. Or if you intend to give the whole structure an interesting/proper character the ceiling below could be put together from old clay house bricks in a form of arch like tunnel – front to back. The remaining layers of the oven go on top as per normal as they exist originally. If you source left over material for better price you can over-engineer all parts which is only positive in building ovens outdoors.
By Rado
Rado,
First let me say Happy New Years to you. Thanks for the great feedback. I’ll try to answer some of the questions that you posed and add some clarifications. I’m finished with the arch. drawings, just need to get them scanned so that I can share.
The Quickcrete specs say that it is a 4000 psi compression strength. I had not realized that there was also an aggregate mixed in with the Portland. That makes it more economical for filling that walls and pouring the footings / pad from which should be ok. The Quickcrete typical use is in dry setting posts and such and then adding water to the mix to set it.
The 6 x 6 m slab. I think that we have settled on cutting joint groves every 5 feet. It will help with the aesthetics by giving the pad a symmetry of 5 feet blocks. The four corner posts will set exactly in the middle of the 4 corner blocks and should look good. We will etch and stain / texture the concrete after all is done. Haven’t decided exactly what yet. We will put footings in the correct places to support the weight of the oven, the kitchen island and the four large 12″ x 12″ posts that will support the roof structure. (Picked these up dirt cheap too for $5 a linear foot) When you say you buy 2 cubic meters of the blend you are talking the Portland dry mix, correct?
For flagstone mounting I hadn’t thought of gluing the stones to the wall but that sounds like good idea. I was going to use a good mortar and concrete screws to support the flagstone where needed but dry fitting them and gluing them in place with minimal mortar joints would be a great look as well. Decisions, decisions.. :)
The smoker that you mentioned is intended for a cold smoke < 100 deg. F. What I am after is a temp. range between 180 – 300 deg. F with the most common being 225 deg. F. I would love to cold smoke my own sausages and salmon but the main goal is to smoke brisket, ribs, pork butt, etc. for extended periods of 10 – 16 hours. I wonder if I might be able to accomplish this with the oven itself and using the cold smoker approach by heating the oven and letting it cool down into temperature range and then applying smoke in the oven and putting the oven door on to retain the heat. The most simple way I could figure out would get me frowned at by most BBQ enthusiasts and that is to by a vertical gas fired 34" smoker and fitting it into the structure, which would be simple. You set the temp you want, load your meats, load your wood chips into smoker tray and set your timer and go to bed. There is some appeal to that I have to admit but the purist side of me takes issue with it. :) Converting the bottom chamber into a smoker does seem doable and, if I were to do it, I was thinking of using a propane assist in the smoking chamber to get it to temp and then having a small chamber for producing the smoke. This may give me some of the convenience of the gas fired smoker, especially if I put a temp. control valve on the gas supply. This would allow for the set and forget functionality and would allow for a wide range of temps or just a cold smoke if desired.
I’m having fun sourcing the materials as cheaply as I can and have approached it like a game. I’m trying to not pay retail price for anything which is a exercise in patients at times but like you said it allows me to over engineer all parts ( did I mention I’m using 12" beams for the vertical supports on my covering structure. :) ).
All I am waiting for before I get started is the building permit. The pretty much make you get a permit here if you put a roof over anything. This will be a fun build. Thank you for sharing your knowledge and designs. It really is an amazing thing you are doing.
By John Sheppard
I got interested in a backyard pizza oven a few years ago. Last summer we built a deck and now it’s time for the oven right off the decking. I am interested in a well built oven to cook all different foods but a much simpler design. Is that possible? I am a very good carpenter but never really worked with brick and mortar other than floor tiles.
Thanks, Tom.
By Tom
Hi Tom,
Yes it is possible and easy to make a smaller and simpler oven, it is only a designing matter, involving perhaps less material. Some people do not even create the flue – smoke box – outside in the front minus the connected chimney. It is wise to make the firebrick part properly, plus cladding and thermal insulation as they are, then the oven performs normally well so it does the cooking job as it should. It’s what the oven is need for.
By Rado
Thanks for the quick response. One of the problems that I am encountering is that the deck that I want to build the oven to is 32 inches high off the ground so I will have to come up with the walls flush with the decking, make a floor and then continue up about 36 inches to pour the hearth. So there will be added weight to the pad to start with. I am thinking a 36 inch wide oven size with a flue and opening would be good for me but I would eliminate all the other fancy stuff and make it very well insulated. Does that sound logical? Could you also tell me what the typical donation is for the plans because I don’t have a clue. Thanks for your help, Tom.
By Tom
Hi Tom,
By all means you can make the oven look modest on the outside, why not, but the performance remains and counts! It will do what it should anyway. Yes logical; the extra insulation thickness is only practical, always, and it does not take much to do at all.
Regarding the oven building workshops by quick download or by mail on cd’s, basically; for all world’s destinations it’s $6.50, that covers expenses to send the oven building cd out by priority AirMail or by download. The page linked below gives more details also on my second and third workshop for building Masterly Tail oven designs (more details further below). Paypal buttons are down the page, paypal makes it half way faster. People at times donate to the website cause, basically I include the original MTo design plus the latest MTo design automatically to everyone who supports with $30+. You will receive a confirmation email from me with my further thank you. The details page.
I will email you back with the confirmation details.
By Rado
I backed it up on en external hard drive! Thanks for the info. I’ll keep you posted on the status of the oven. I’ll probably try the 3rd Generation MTO. I’m a history teacher (teaching 9th-12th grade students) that has a new role in our school district. I’m now the Instructional Designer for High Schools for Metro Nashville Public Schools. I get to work help teachers in incorporating technology into their teaching in hopes of engaging students and helping to craft rewarding student experiences. Our district is big on project based learning. I’ve been floating around the ideas of getting students to build a wood fired oven at one of the high schools. It could be a fantastic learning experience for them, especially if they incorporated a variety of subjects. I currently create a lot of films for the district as well. Not sure if you’ve done much filming to support your site, but for some of your most frequently asked questions, such companion material of techniques would be fantastic. I have lots of resources/insights for crafting with video camera lenses, handheld or tripod, if you need anything. Thanks again!
When I’m rich and famous (ha, ha), I’ll start a wood-fired bakery in East Nashville specializing in naturally leavened breads and pizzas.
Take care,
Jason
By Jason
Hi Steve,
Exactly this oven structure absorbs 93 full size blocks of the 8 in. x 8 in. x 16 in. dimensions (7-5/8″ x 7-5/8″ x 15-5/8 inches Actual Dimensions.)
By Rado
Hi Rado.
Happy new year. I have just started building an oven in my back yard and have a couple of design questions. Please forgive me if the answers are obvious but I am pretty green when to comes to block laying etc-
1- When you are laying the fire brick base for the fire chamber, why do you split a fire brick in half and place the two halves in position instead of just laying a complete block side ways?
2- Why do you set the upper part of the fire chamber back from the front edge of the base? If you laid it flush with the front edge would you be able to remove a row of fire bricks in the base along the back of the oven?
Cheers and your site is a great resource.
Daniel
By Daniel
It is about the criss-crossing bricks. I suppose there may be more ways for doing this. But the rule is, avoid laying firebricks like it’s done with normal brick laying brick arrangement-pattern, wall tie, e.g. when building normal house walls. The heat expansion movement within the firebricks would start to break some or most of them in half.
1. Each side saves one firebrick. You can place full firebricks instead of halved. WELL, look say at the New MTo design image ‘3rd-mto_0750’ (the part sequence page) … you could place one firebrick sideways in that place, instead of the two halves. But it would be longer by about 1/3. Also two thirds could be used. But I reckon two firebrick halves remain more stable.
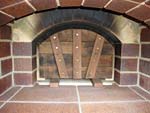
2. The entrance is set back by 2 inches – 50 millimeters because the wooden door, when it’s used to close the oven, can comfortably sit on the hearth and behind the ash chute as well. It is quite practical this way. But if you for instance planned on not using the door, than yes you could start with the entrance flush at the front hearth edge. I will try to find an example image which depicts how that wooden door fits into there nicely to close off the oven.
Oven wooden door in place closing off the oven
By Rado
Hi, my name is Ianes and I’m from Romania. I want to know please, if it is possible,
1. which is the mathematical proportion (or ratio), between the volume of the fire chamber of the oven, and the chimney height? Or in the other words,
2. the ratio, between the volume of the combustion chamber and chimney smoke volume?
3. ratio between the height of chimney and his diameter?
P.S. Sorry for my English!
Thank you very much.
By Traian Ianes
Hi Traian,
Your English is all right, better than my!
1 a. it is 63% ratio for wood fired ovens, entrance door height to internal vault (firebrick hearth floor to ceiling arch highest point) example given 10″ to 16″
1 b. in gas fired ovens the entrance can be lower (at least temporarily when heating up the oven or when loading or unloading the oven when it is handy to have the entrance bigger)
2 a. the chimney length is not a functional issue, it is to drag hot fumes away from the oven operator through the pipe as hot air passage
2 b. but the flue hood needs to have proper space size so it functions properly, e.g. to direct 100% of all hot fumes exhaust upwards into the hot air passage (if improperly sized the oven gets carbon color on the outside just above the facing wall decorative arch (it it is an arch shaped)
3. wider is much better, always (unless you built an indoor oven where you take into consideration also draft of the chimney)
The flue hood size of this oven functions 100% for all ovens.
By Rado
Hey Rado,
I would like to thank you so much for sharing your plans/photos. I am in the process of building the 3GMTO design oven and would like to have the front completed portion of the oven be flush with the chimney. Would the best way to accomplish that be to simply do one for of the brick arch rather than 2 as you do on the your MTO oven. It seems if I do that it will allow me to have a little more of a shelf in the front of the oven and have the front face of the oven be even with the chimney. Would that spacing difference cause any problems with the function of the oven. I am assuming the double row of brick arch you have on the 3GMTO is more cosmetic, but I may be wrong. I hope my description is not too poor. I am talking about having the completed fire dome, another arch of firebrick as you have, the spacing for the chimney, a brick arch x2. I am asking if I do just the 1 row of brick arch on front of chimney and simply go up from there and make the front face of the oven all flush. I think this would allow me and easier time with the roof of the oven as I am a novice with construction projects. I would brick the entire front of the oven and put siding on the sides and have several pieces of slate that I will use for the entry floor/shelf. I am loving how the oven has come out so far. I think what I am asking is similar to how your Swishy oven design is on the front facing. Please let me know if this is confusing. I also noticed that the finished arch on the front of the oven appears to be separate from the arch which is continuous with the chimney. Would that create problems as the oven front would be incorporated in the chimney? I am having to start making some decisions on the finishing design of the oven and cannot wait to light up some wood fire in that bad boy!!! We are in Louisiana and are gonna fire up some wonderful seafood pizza’s.
Thanks,
Jonathan
By Jonathan Gisclair
i don’t have a website so i’ve been alittle confused as to how to download your building instructions. i’m very happy to send payment but i’d prefer to just have them emailed or downloaded. help.
By vincent leifer
Hi Rado,
Wondering if there is a Materials List available to download for the 3G Masterly Tail oven?
CHEERS!
Mike
By Mike Lea
Oops, found the link.
For everyone else, here is the link, also on the same page are the diagrams pdf files, enjoy: new MTo oven design material list and diagrams.
By Mike Lea
Hi Vincent,
No problem at all, thank you very much, all material were emailed to you promptly.
By Rado
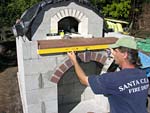
I noticed that in some of the pictures, the builder is wearing a “Santa Clara Fire Dept.” tee shirt. Well, over 10 years ago (~12 or 13) I was searching for info on building a pizza oven and found a guy who was in Australia I believe and he offered to send me a cd in trade for some fire department work shirts. Is that you? If so, I’m glad you’re using the shirts and this web site should help with finally building my oven!
Regards,
Paul
By Paul P
Hi Rado
Great website! I purchased your plans recently to help me build my oven. I’m a little confused at what concrete to use for the hearth. Vermiculite & GP cement for the insulation part – OK, but for the strong concrete mix, your documentation and info on the website has me confused on this: I was thinking of using 4 parts standard pre-mix concrete with 16mm stones, with 1 part GP and 1 part lime. Will this stand the heat OK? This should work out about 4-5 times cheaper than using refractory cement mix along with GP and lime and crushed stones, as mentioned on above on this page.
Cheers
Adam
By Adam
G’day Adam,
Yes people often use the premix concrete in bags instead getting crushed stone plus sand, it’s quite common.
There are two premix concrete kinds. One for footpaths and slabs, which is the stronger type. The other for filling fence posts holes (this one is weak in comparison.) Add into it the additional lime/cement by ‘volume’ measures.
If mixing by hand, mix all dry stuff to combine it well with your shovel before adding water.
By Rado
Hello Rado,
We spoke years ago and I hope that you’re doing well. I got your CD in exchange for a couple Fire Department tee shirts… Well, I’m finally retired and at a point where I’m making my pizza oven and visited your site again. I was looking at some images (image #0523) and sure enough there you are with the tee shirt on! Your site sure has changed… I’m looking forward to the project and the help from your site.
Regards,
Paul
By Paul
G’day Paul,
Well spotted! Thank you, it’s been a longish time, I’ve truly enjoyed your T-shirts. They are very popular and I must say of a marvelous quality. Currently I use them only when painting, I have gotten some very nice use out of both of them. Please email me, I will send you the link for this latest oven design so you have it as well.
By radko
Hi Rado, I would like to receive a CD of the build process. Is there a form that I need to fill out with my address and billing info? I don’t see one. Thank you.
By Jeff