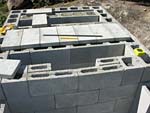
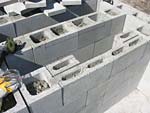
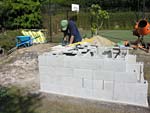
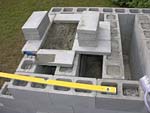
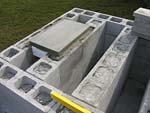
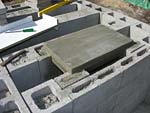
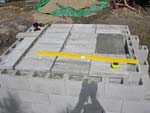
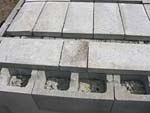
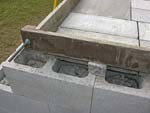
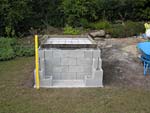
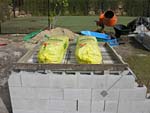
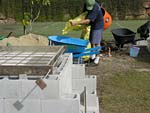
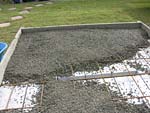
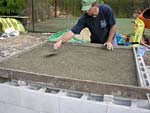
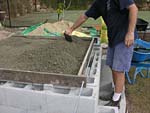
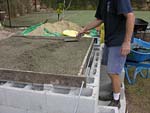
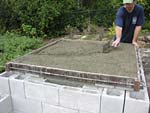
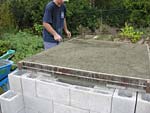
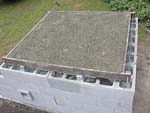
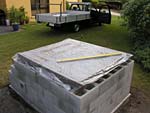
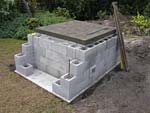
Insulating layer for under hearth slab
4 inch – 10cm light weight thermal insulating layer for under the hearth slab. For efficiency. Masterly Tail oven design (3G MTo) – 3G MTo Main Page
Pointers:
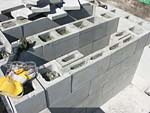
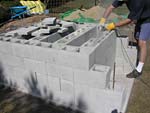
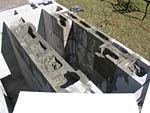
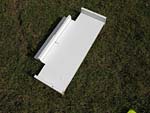
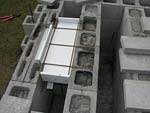
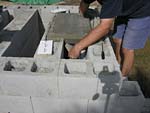
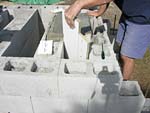
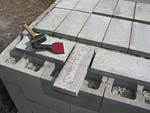
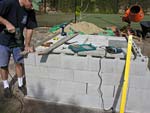
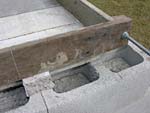
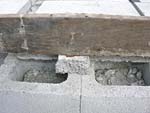
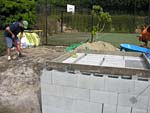
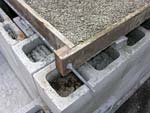
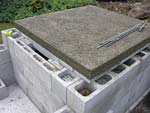
1. Note images #0329 to #0385 – I didn’t use metal angle or any thin plate (personally I would use only non-corroding) so I quickly made this cast. BUT here you can experiment with other approaches easily. Right from the point of the picture #0328, a metal plate or small concrete slab in suitable size can be simply placed on top to cover the surface. Or the capping tiles can be laid in the front on a metal angle, as long as that angle holds in place (for instance it can be fixed with blocks that later come on top). For me making a little pad like this one is a question of only an hour.
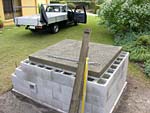
2. People who prefer not to build the ash storage with the ash drop opening situated at hearth level (who remove ash on a pizza paddle instead) do not need to do this at all because they obviously use full size blocks in the front (instead of the slim blocks whose are there just to form this slick ash slot.)
3. Hearth slab thermal insulation
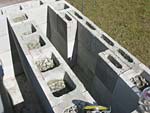

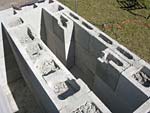
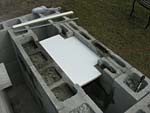
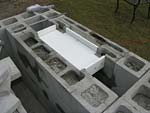
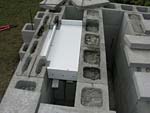
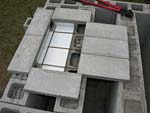
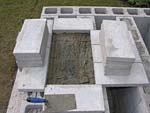
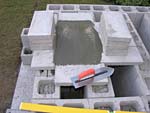

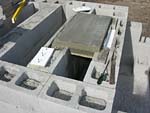
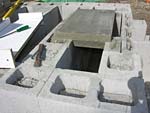

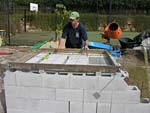
Images from #0329 to #0385 – right from the point of image #0328 – instead a simple metal plate or a small concrete slab of suitable size can simply be placed on top to cover this surface. Also these capping tiles can be laid on a metal angle in the front, as long as the angle will hold in place.
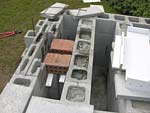
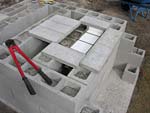
by Dean – instead of the wooden support, here comes the use of angle iron approach.

Part 3 Making “thermal insulating layer below hearth slab” on this page contains 71/153 photos.
Total images 0322 – 0474 (out of 2,785 all up)
3G MTo main page.
There are also the Swishy oven and Original MTo designs to consider or to look at first.
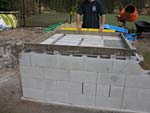
Dimensions of this insulating layer
Please look at this image: 3rd-mto_0690 from the making firebrick hearth sequence.
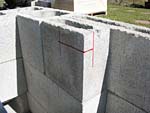
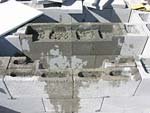
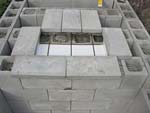
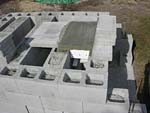
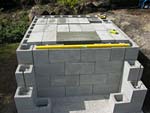
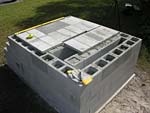
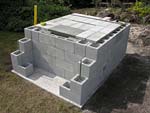
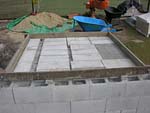
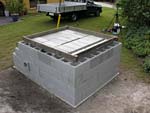
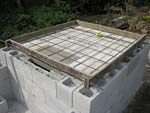
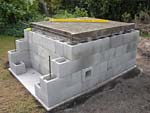
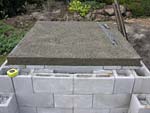
Three layers consisting of insulation (with capping tiles under), hearth slab with firebricks.
The insulating layer is 4″ – 100mm high/thick and actually 2 inches – 50mm wider on both sides (left and right), and the same 2 inches – 50mm longer at the back, than the dimensions of the hearth slab you will use. First make this lightweight insulating layer and then the hearth dense concrete slab goes on top.
Remember that these wooden frames, boxing, can be all produced with the same four pieces of wood. Starting with the concrete ground slab. No need a new timber for each frame.
Respond to the Insulating layer for under hearth slab article:
22 Comments
Sorry, the comment form is closed at this time.
What sort of temperatures do those capping tiles that support the hearth slabs see? I have a number of old wooden 4×12 and 6×12 beams I was hoping to use to support the hearth instead of building up those concrete block inner support walls, and I wouldn’t want them to catch on fire :-)
By Revin
Revin,
Not much heat soaks downwards through the 4″ insulating layer. It gets warm down under there some time/hours after the cooking but not too warm. Are they a hard wood beams? Sounds good to me, I saw people doing this. Keep in mind that the oven is heavy, so if you have a number of them that you can spare, an extra robustness or over-engineering under won’t hurt. Still it is rather a small structure so it can be easily afforded. Before the capping tiles (or some bricks etc.) are placed onto the beams, cover the beams with some metal sheet. To protect them not only from the potential fire damage but also from a water damage. Basically treat it as if you built a masonry fireplace inside a wooden cottage, caution and safety are always wise — and so is a good food ;-)
By Rado
Rado,
I realized that the metal lattice, mesh for reinforcing the concrete, I have available here (probably about 1/8 inch) is much smaller in diameter than the one you show in your pictures. I was told at the store that they don’t have a larger diameter because it’s not necessary. Should I double up the metal I have to add more support?
Best,
Naeem
By Naeem
Hi Naeem,
I know this gauge it is commonly used, not a problem to use it. But if you knew you will end up with an left over piece, or pieces, it cannot hurt to place second underneath. Basically the two lattices inside this insulating slab would be separated by ~ 2 inches distance, the first would be placed 1″ higher up from the tiles, image #0416, and the second lattice could be 2″ above the first/bottom lattice, nearly like on the image #0431.
Can you please email me a few photos of this when you work on it? (large original pictures as they come out from camera)
What do shops sell for reinforcing e.g. car driveways surfaces or slabs for building houses? Maybe individual rebars instead of pre-made stronger reinforcing mesh? A friend of mine in business calls this reinforcing bar “roxor”.
By Rado
Hi
and thank you for your help so far.
I have now started on the building, but I’m wondering if I can use Leca blocks
under heat magazine as insulation, and Leca (small loose balls) as insulation in the walls.
Best regards
Henning, from Norway.
By Henning
Hi Henning,
Lots of people from around European countries have used these Leca balls. They work in these ovens/conditions fine as it seems. They have thermal insulating properties due the air in them and withstand this heat levels. The Leca balls, if I imagine correctly, will have slightly larger mass density when compared for example with Vermiculite, and Perlite or fly ash for instance. HOWEVER in these temperature levels, and within those first 3-4 hours of cooking / baking time, the oven performance-efficiency will vary only very slightly.
So, I know Leca is being used successfully. Although I was not enlightened yet as to how exactly Leca blocks work, I assume they will most probably typify performance under there similarly as do Hebel blocks (which is great material as well.) If you can, add slightly higher amount of the balls especially for covering the oven over the top. I would suggest to mix them with a little of cement, as an boding agent, to try to close-off air spaces between these balls so the heat does not rise/run out up through in between them.
* Do you have any technical data for Leca balls and the blocks? E.g. bulk density (mass per some volume amount) or thermal conductivity, compressive strength of those blocks, or anything else about this material (would be the best if any such information came first hand from the Leca manufacturer – so the info is not changed several times over as it’s passed on from a website to a website.) What’s the size of thse Leca balls.
** Could you please email me close up/sharp photos of the blocks and balls once you bring them home? (A large file-images would the the best, thanks Mate I’d post them here for other people.)
By Rado
Rado, how concerned do you get about being uneven on the capping tile and first vermiculite layer?
I am uneven on each side by a couple mm to a 1/4 inch on the capping tile layer. I assume accuracy is more important on the subsequent layers and especially on the fire brick layer.
I am starting the vermiculite layer tomorrow.
Rick
By Rick
Hi Rick,
Thanks for the image yesterday, goes real well!
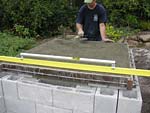
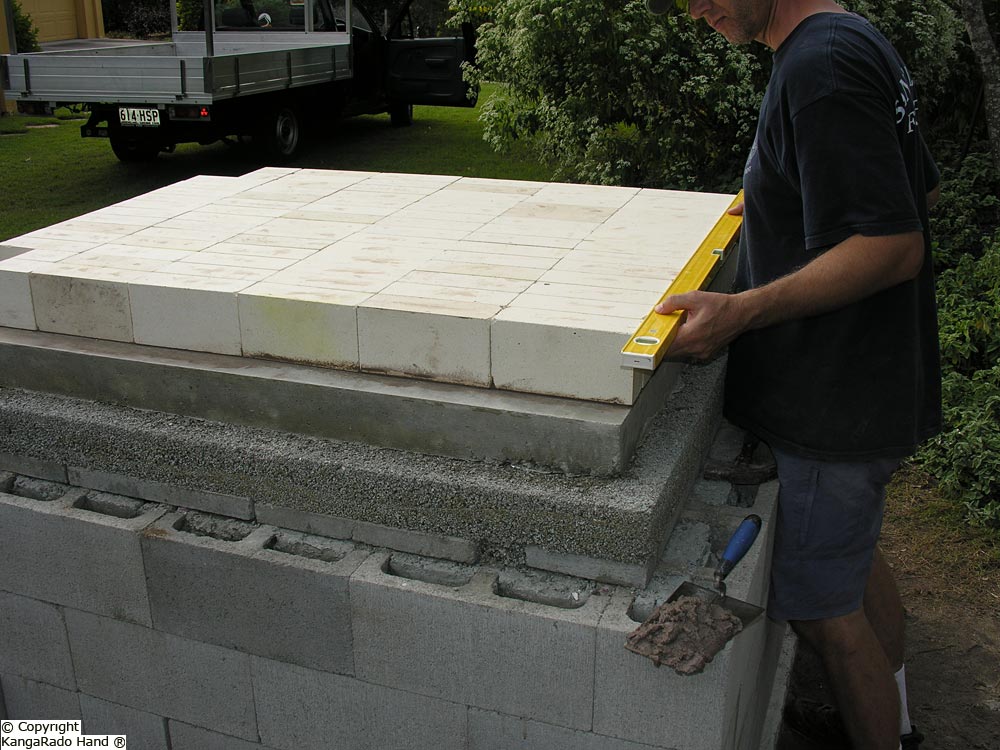
No concern there at all. 1/4 inch unevenness in the thermal insulating layer is absolutely fine. But for the next job, when you place the frame for making the dense concrete slab on top, put that one into a nice water level. It will be very easily to do; place the frame on the insulation and then with spirit-level tool (e.g. images v and 3rd-mto_0500) check where the level is going down. And if it does then simply fit a little/thin wooden or brick etc. pieces underneath that fame spot to lift it up into even level. I always check this and adjust it when needed. The dense concrete slab is more important to have even because then it’s easy to make the firebrick hearth into even floor.
* Here: notice images 3rd-mto_0403, AND these 3rd-mto_0406, 3rd-mto_0407, 3rd-mto_0408 to see precisely how I leveled the first frame for the thermal insulation into level – they show the thin pieces slid under the frame in a couple of spots – if you haven’t done it yet, or already.
Rado
By Rado
Hi Rado
I’m building the MTO. Are you saying to put a full 5 inch layer of vermiculite/cement first and then add a 5 inch layer of cement?
How much rebar in each pour?
That’s Great Rado-
By Jim
Hi Jim,
Yes, both layers are 4 inches thick but you can go perfectly also with 5″ thickness in each as it cannot hurt obviously for the logical reasons. On top of the tiles; 4″ (or if you like 5″) thermal insulation layer (5:1 Vermiculite : cement — this is actually light-weight concrete mix) and on top of this insul. layer the surface the dense concrete slab of also 4″ (or 5″) goes 4:1:1 (4 parts stones with sand : 1 cement : 1 lime), all parts are in volume sense. No need to add to much water so the mixes are not too wet, like with any work with concrete.
See this page, detailed information on the work with vermiculite for making this insulation layer, it is in second half of the page, how I mix the Vermiculite with cement by hand and also practical hints about the water portion which can be handy to you too.
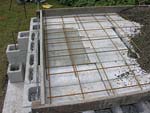
I use one piece of metal mesh for the whole thermal insulating layer, as you pour the mix in there with a shovel, use fingers to uplift the mesh, so the mesh stays in position inside/within the mix. Similarly for the dense slab, one mesh for the whole surface, in the middle of the concrete layer, (see images 3rd-mto_0514 and 3rd-mto_0432).
Rado
By Rado
Great site with amazing info!
As I am thinking of building an oven myself in the near future I am interested in obtaining your DVD with all information as you mention on one of your pages:
“Also a complete WorkShop on CDrom is available. If also the second and the third newest Masterly Tail oven (MTo) designs are posted to you, then all 3 folders arrive in your place on one DVD disk (instead of 3 CD’s).”
Can you please advise how to order this?
Hope you do not mind, but I have a few questions.
My first question is in relation to the use of concrete as an insulator.
In your plans you use a concrete base directly under the firebrick floor, with the thermal insulating layer under the concrete layer.
This is the opposite as to what Forno Bravo uses in their oven designs, see attached.
Can you please advise as to what is the difference here?
Also, if I want to change the dimensions of the oven (larger or smaller) how do I adjust everything so that it still works fine?
For instance, the oven build by Ilog Maria is massive!
How does one adjust the basics to get to this sort of size?
I am looking into using tapered bricks form the arches, see Darley firebrick page, what are your thoughts on this?
Thanks for your assistance,
Cheers,
Martin
By Martin
Hi Martin,
What do you plan to do in your oven and how much/often? And how large internally do you intend to make it?
With the dense slab and the firebricks right on it, the slab adds to the heat absorbing dense mass. As you use the oven, while already cooking in it, more heat absorbs into it too, which adds to the heat absorbing capacity. This also keeps the floor hotter for longer, logically. Under this slab is the lightweight insulating layer. Even though the heat tends to move upwards, it also soaks through the dense slab. E.g. ~4-5 hours after heating up to cooking temperature you would feel quite a bit warmth also under the insulation, but not much because the thermal insulating layer is very efficient, it does what it should. When the oven is built on a bedrock or on a hard ground, in such conditions there is no need for thermal insulating layer under the dense slab, such oven performs extremely well, and very efficiently too. If you look into the original MTo folder on the CD (or within the original MTo download), there is the subfolder with the low set oven, which was build on a bed rock, this oven is perfect and is also used for business during work days and plus on a few weekends during year, for production of lots of pizzas and the floor is perfect for pizzas, also other cooking roasting or baking obviously.
That larger oven you mentioned I do not know precisely what plans they used nor how they hold/support both sides on whose the arches sit. You mentioned tapered firebricks for the arches, yes they are great of course. It is better to make the oven deeper too not just wide. The wider the arches the more pressure in them outwards so just support the sides if too wide. It is very easy to change the oven internal size/space to what sizes you need, just by adding in or taking off a brick or two from a side. Then all remaining matters basically stay the same except now the new footprint dimensions (as altered) will be different. Just add on to the slab exactly how much you add to the firebrick part in a side. If you wanted to build heaps larger oven you would need to strengthen the structure accordingly. But you can over-engineer the oven if you like so to speak, it never hurts when it comes to brick ovens. Rather the opposite, robust oven structure shows the right character.
The drawing you sent me, is it a kit or a prefabricated oven? What size is it and for what use?
* Regarding the oven building workshops by download or mailed by Postal-system on physical workshop cd’s, the page linked here below gives more details also on my second and third workshop for building Masterly Tail oven designs (more details further below). People at times donate to this website cause. You will receive a confirmation email from me with my further thank you.
The details page.
By Rado
Hi Rado,
Thanks again for your helpful and prompt reply.
My intend for the oven is the usual pizza, but also general cooking, roasting etc., so everything.
We have had an oven before in Western Australia (Mediterranean Ovens) and this was used regularly for pizzas, roasting capretto etc. The Forno Bravo is a commercial kit oven.
I now understand your placing of the concrete slab.
I also have done some further reading on the properties of concrete and was amazed to find out to what temperatures you can take this, so yes it does make sense to have it directly under the hearth floor.
Good to hear your advice re the size of the oven, make it deeper not wider otherwise I need to build buttresses to contain the arches! ( J )
I also like your rectangular design, as this to me seems to be somewhat easier to construct then a full dome.
I was thinking of the tapered bricks because I thought that they can be dry laid as the downward pressure should keep them in place.
Anyway, it is early days yet, as I am no way ready yet to start building.
This is all preliminary research.
Again, thanks very much for your patience and good advice.
Kind regards,
Martin
By Martin
Hi Rado,
I had to smile when I read your email. I have watched too many movies. For what ever reason I never imagined Australia had hills, I just thought it was flat like the middle east our the Midwest of USA ;-)
Only question I have currently is that some folks are saying the use of Vermiculite will not insulation the bottom enough, generating heat up to 250-300 when the oven has been used for several hours. Any experience with this. I could not tell if this was a result of using too little vermiculite (2″ instead of 4″), using cement as the adhesive instead of Portland cement, etc. So wanted to see if you had any experience with operating temperature under the oven.
An option was to go with ceramic insulating board, but I found it to be VERY expensive, so wanted to make sure it was justified before going there.
By Frank
Hi Frank,
Ah, we do have many hills, tablelands too. But for sure not as high as those great hills you have in USA. Feel free and welcome to come down to enjoy this part of the world Mate.
Both ways work, I have to be diplomatic because we use any of these materials for different projects. You could go either way, with making the insulation below the slab in form of the Vermiculite layer, or with the ceramic insulating board. I will not discourage you to use either, both will work real well. Which folks were you talking to, some who sell material? Do the same people sell vermiculite as well?
Well, all of these products are superb. In the past and also in quite a recent past (before production of ceramic insulating products boosted and before home DIY work with refractory product spread also around general public, WFO’s contributed), WFO’s – firebrick designs or precast domes or kits – were set into a layer bath of fine dry sand. That works very well. (I do not advice to pour sand on top or around sides of the oven for several reasons!) Now, sand conducts heat and absorbs it rapidly, if you ever walked on a summer day on a beach you know how hot the sand gets. That means, it is not a good thermal insulant because it conducts the heat real well. Insulating material should not absorb heat well, the less heat it absorbs, the more effective the insulation is. Yes after some time the heat might soaks also downwards through the bottom too but it is just warm. You will not experience any problem in this respect with the 4″ insulating layer made from Vermiculite. However the top needs the insulation a lot more! There is not considering difference between those two material in this place. It is well calculated.
By Rado
Hi Rado,
re: Insulating layer for under hearth slab, I made this two days ago, using one part Portland cement and 5 parts of a perlite/vermiculite blend along with one part water. I removed the frame today and the structure looks very similar to yours (nice smooth sides and compacted). The edges and corners are a bit brittle and will crumble with if I put force on them. Is this how it should be (the center seems very firm) or did I not add enough water to the mixture? Also, how long should I wait before pouring the cement slab on top of this?
Thanks,
Jeff
By Jeff Meyer
Hi Jeff,
Yes, as you described it, the insulating layer result is how it should be. Adding LESS water into masonry mixtures, cements/lime based mortars, concretes, is always preferred. Too much water mixed in weakens masonry.
You can create on the top the dense slab now. Two days waiting in between is enough. Cover the dense slab surface with a plastic while it cures (if windy, dry or hot weather outside, you can splash water on it as well a few times during the first 24 or 48 hours to protect its quality.) And before it sets/hardens (until the cement is properly firm to touch), smooth it sufficiently with the handheld metal concrete smoothing tool. It is a good fun and relaxing activity to do that. While it’s being done, someone can bring e.g. a glass of refreshing juice into your other hand ;-), it is all related to building pleasing in all aspects ovens.
By Rado
Hi Rado,
Thanks for sending the material.
Having reviewed it all I’m going to build the 3G MTO with a minor modification.
I want to use the space below the oven for wood storage. This means that I will have to omit the two rows of supporting bricks below the oven and replace the capping tiles with a concrete slab to carry the weight of the oven.
I could use a thick steel plate to carry the oven, but I’d rater use something non-corrosive like a piece of fibro with a concrete slab on top.
What are your thoughts on this?
What would be the required thickness of this concrete slab?
Cheers
Poul
By Poul
Hi Poul,
Logical task. If you plan to create empty room below the oven. It is very small area surface so, instead these capping tiles, making a concrete slab should not be an issue. Just reinforce it with the metal mesh and 75mm to 100mm = 3″ to 4″ thickness is the best. Now by creating this slab an additional height of ~ 75mm = 3″ would be added, therefore just sink the extra thickness downwards. Then the insulation layer goes on top of this slab.
The capping tiles are being just simply placed on top of walls and the two supporting walls in the middle. Therefore these underneath tiles could freely adjust if there was any, even a slight, movement due to temperature change below the lightweight insulation layer. Even though that is very hard to happen. But if you added an extra inch to the thickness of the insulating layer, in this scenario, less warmth will soak downwards too.
By Rado
Hi Rado,
Thanks. That was exactly the advice I was after!
You’re a mountain of knowledge!
You asked if I’m in a cold climate. I’m not. The temp hare in Malaysia is 30-32 degrees C all year round!
Cheers
Poul
By Poul
Hello Rado!
My wife and I are looking to build an oven/ furnace of some kind for hobby use.
Ideally, this one oven could be used as a kiln for firing pottery as well as a foundry for smelting aluminum (do Australians say aluminium like the Brits?) and other lower temperature metals (not copper, silver, gold, steel, or iron).
Aluminum melts at around 1220*F, and earthware pottery fires at 1950*F. Obviously, that’s a bit warmer than the average pizza cooks.
So my (probably silly) question is do you think an oven like this can reach these temperatures, and if so, will it withstand repeated uses at these temperatures. I know it’s built of refractory bricks, but I figured I’d ask.
Thanks!
Mike from Texas
By Mike
Mike, how lovely it is to connect with person like you.
We say it both ways, aluminium or aluminum. Maybe the global mix influence.
With a wood fire in this setup, meaning the entrance size and this entrance continuously opened, the oven reaches carbon burn off, 550°C = 1022°F temperature very easily.
Melting Aluminium at 660°C = 1220°F should not be a problem at all, just create a higher red hot embers amount nicely spread on the hearth surface. Higher temperature levels might be achieved with a gas burner/s. Wood fired would reach the stoneware temperature level, but the oven would need to be designed differently – like a wood fired pottery kiln for instance. Without any changes, you might produce wonderful raku pottery firing. And also, you will need an additional thermal insulation e.g. ceramic blankets around the oven on the outside to allow it to make more more smoothly / efficiently.
However: toxic material should not be present in oven et-cetera where food is being prepared. Some glazes, salts, and all metals, are unsuitable.
By radko