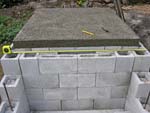
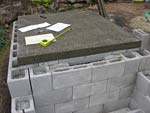
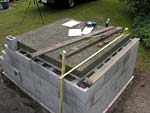
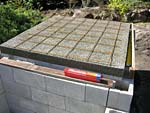
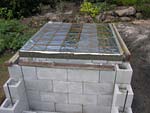
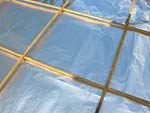
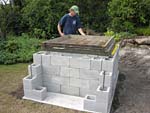
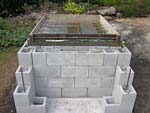
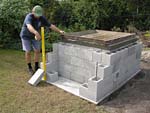
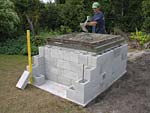
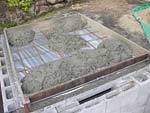
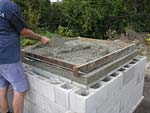
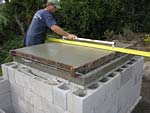
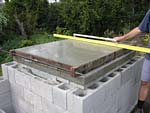
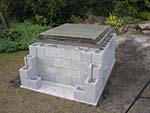
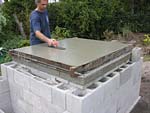
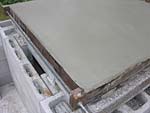
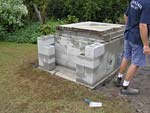
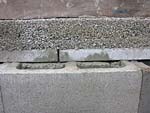
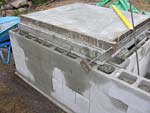
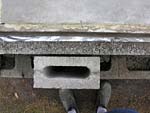
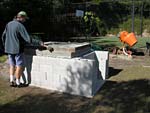
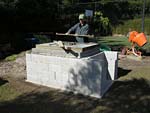
Top concrete slab for making hearth
4 inch – 10cm thick top concrete hearth slab on which firebrick floor is then placed.
Masterly Tail oven design (3G MTo) – 3G MTo Main Page
Pointers:
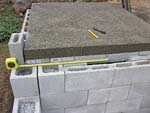
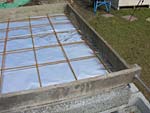
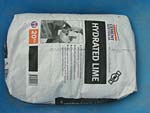
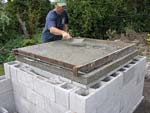
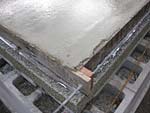
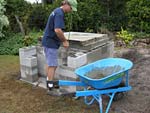
1. I use 4:1:1 concrete mix (by volume: 4 parts sand & stones, 1 part Portland cement, 1 part lime).
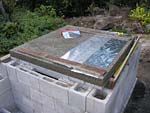
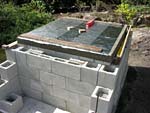
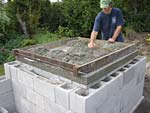
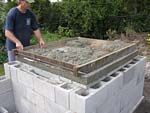
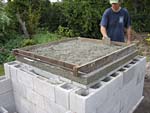
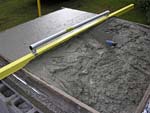
2. As the concrete starts to set gently smooth the whole slab surface with a metal trowel and repeat again once more when the surface is nearly hard. Lime added into concrete makes it to set slower when compared with ordinary 4:1 concrete. This way you get more time for washing a wheelbarrow (but the curing is not twice as slow so do not go away to have a snooze or do somethings along those lines.)
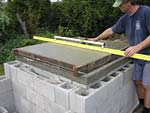
3. The slab is of course reinforced.
4. Top hearth slab
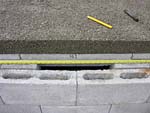
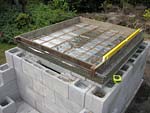

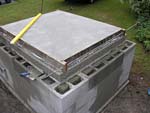

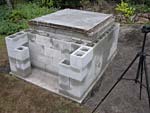
Dimensions of the top slab for firebrick hearth
Here are the hearth concrete slab sizes, so far for 2-1/2 inches, 65mm and 75mm thick firebricks. If you need any help to calculate dimensions for this slab if a different firebrick size is used, because there exists heaps of firebrick sizes, just drop me a line.
When the hearth is built from 2-1/2 inch thick and 9″ long firebricks
The slab width consists of 17 (2.5 inches thick) firebricks x 6 (9 inches long) firebricks in the length + 2 inches thick cladding on both sides and cladding at the back. I usually add plus 1/2 inch extra to the slab for each side and back, just in case. The hearth slab is 4″ high or strong/thick.
Dimensions: 47.5″ * 56.5″ * 4″
Calculation:
Width: 2-1/2″ x 17 = 42.5″ + 5″ (cladding on 2 sides) = 47.5″
Length: 9″ x 6 = 54″ + 2.5″ (cladding at the back) = 56.5″
When the hearth is built from 64mm or 65mm thick and 230mm long firebricks
Dimensions: 1225mm * 1440mm * 100mm
The slab width consists of 17 (~65mm thick) firebricks x 6 (230mm long) firebricks + 50mm thick cladding on both sides and cladding at the back. I usually add 10mm extra to the slab for each side and back, just in case. The hearth slab is 100mm high or thick.
Calculation:
Width: 65mm x 17 = 1105mm + 120mm (cladding on 2 sides) = 1225mm
Length: 230mm x 6 = 1380mm + 60mm (cladding at the back) = 1440mm
When the hearth is built from 75mm thick and 230mm long firebricks
The slab width consists of 14 (75mm thick) firebricks x 6 (230mm long) firebricks + 50mm thick cladding on both sides and cladding at the back. I usually add 10mm extra to the slab for each side and back, just in case. The hearth slab is 100mm thick or high.
Dimensions: 1170mm * 1440mm * 100mm
Calculation:
Width: 75mm x 14 = 1050mm + 120mm (cladding on 2 sides) = 1170mm
Length: 230mm x 6 = 1380mm + 60mm (cladding at the back) = 1440mm
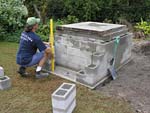
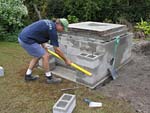
Part 4 Making “top hearth slab” on this page contains 53/100 photos.
Total images 0475 – 0574 (out of 2,785 all up)
3G MTo main page.
There are also the Swishy oven and Original MTo designs to consider or just to see them at least.
Respond to the Top concrete slab for making hearth article:
16 Comments
Sorry, the comment form is closed at this time.
Hello Rado,
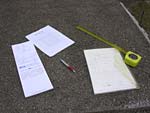
Do you have any copies of your hearth and slab drawings shown in photo # 0480?
I will adjust for the fire brick size when I pick them up.
Thanks so much!
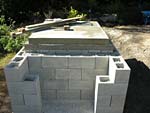
Almost up to slab height :)
Kenny
By Kenny
Hi Kenny,
I can scan what’s on the paper and email it to you if you need. I do not have those notes on me where I am now, but it can be done on Thursday.
However:
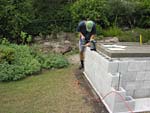
1. basically the 4″ – 10cm insulation layer goes there on the whole surface, minus the thinner concrete blocks that form the sides and the back wall of course. Leave some small gap/space between the inner side of these blocks and the pad so outer wall blocks can go into place easily, e.g. image #0562, or images #1621, #1629 on following pages. Image #2235 is clear hint as well to see the little space left empty, loose insulation will fill it later.
2. the width and depth dimensions of the 4″ – 10cm concrete pad (on top of the insulation) reflect the whole firebrick floor surface, PLUS, 2″ – 5cm in each side and also plus 2″ – 5cm at the back for the cladding layer. It’s easy.
Have you seen this PDF document, it shows U.S. and European 2 1/2″ – 64mm thick firebricks how they go and how many.
Email me photos from your progress how you go.
By Rado
Rado,
Perfect! Just what I needed. I may be ready to do the insulation layer this weekend.
I did not see that fire brick PDF before… Got it now.
Thank you!
Kenny
By Kenny
Hi, my fire bricks are 8 1/4 x 4 1/8 x 2 1/4. Your design is 6 bricks in length using approx 9″ bricks. Do you foresee any issues if I go 6 1/2 bricks in length or is it best to use whole bricks and use 6?
The thickness of my bricks are actually 2 3/8″ for exact measurements. For the width of my oven, 18 bricks across would equal 42 3/4″, almost the same as using 17 2.5″ across as shown in your pdf. For creating the arch it appears that it might require one additional split fire brick (1.25″ thick) to take me up to a height of 16.5″ (my sides will only be 7.125″ high rather than the 7.5″ shown in your pdf).
Thanks for your help and all of the great documentation and 2,783 clear progress photos. Hopefully within the next four weeks I’ll be eating wood fired pizza along with my home brew beer!
Thanks,
Jeff
By Jeff Meyer
Hi Jeff,
By all means you can put 6 and half shorter firebricks in the length/depth to form the hearth (instead of the standard six 9″ long firebricks.) There you will have also one advantage; See both side corners in the front where I save two firebricks? In these both corners start with the full firebrick length as to end up with full bricks also at the rear corners. And the halved firebricks in between – just brake them in half with a brick chisel, that takes seconds.
2-3/8 inch or 2-1/4 inches thick-thin firebricks are perfect for arches. Did you get some good deal on them? You can actually create the exact arch rise, even if you add one extra piece into each arch – simply squash the center-top on the arch dawn-wards/inwards – which effectively pushes sides slightly outwards, this creates a nice kind of elliptical arch shape. Email me photos of the set up if you like, i will have a look at it (but you’ll be fine.)
The same for the 7.125 inches high side walls, absolutely all-right scenario. If you just have a quick look into the original MTo folder, that oven has sides just 6″ high. These variations can be perfectly worked out with the arch calculation. In its sub-folder is the low set MTo which sits directly on the ground (that oven is used for business) and it has only 3″ side walls in height.
Thank you for your nice words about our work. I hope all is a beauty in TX! Here in QLD we have the winter season now, best time for outside work with concrete, mortar and bricks.
By Rado
Perfect dude, thanks! I’m actually a transplant from San Diego living in New Jersey. I’m building an Argentine grill next to the wood burning oven. I’ll send you photos when done.
By Jeff Meyer
Rado, thanks for the site and the download. Got it last fall and am underway this summer building the oven.
For the hearth slab rather than mixing the cement from scratch can I add lime to a premixed bag of concrete? The premix is on sale for $2 per 80lb bag and cheaper than getting sand and gravel.
Thanks
By Grant
Hi Grant,
Many builders do this, just assure that the concrete premix is the stronger kind, a type suitable also for driveways or slabs, which should be mentioned on its packaging. Such mix uses proper cement and 4:1 strength.
How much for instance in cubic foot/feet of the actual concrete do you get from one of those 80 lb concrete bags? The price seems very good.
4:1:1 with added lime for the slab or cladding. And that is 6 parts all up what the concrete consists of (5 parts the original concrete from the mix and then 1 part lime added. Measured all/always in the volume sense, for each part (not weight measure). For instance the parts’ numbers in shovels or in buckets, or cups, etc.. Into 5 equal parts of the concrete mix add 1 equal part of lime. In other words 5 shovels of the concrete mix plus 1 shovel of lime then add water while mixing concrete.
By Rado
Actually it is the 60lb for $2 per bag, my mistake. Yield for the 60lb is 0.45 cubic feet. It is sakrete basic concrete and rated to 4000 PSI and says it is for slabs and footings. My concern is whether I need to mix my own refractory cement for the hearth slab and cladding or the basic premix with lime added. Saving a few dollars is not worth an inferior outcome.
By Grant
Hi Grant,
It is high strength concrete mix if 4,000 psi (28 MPa), all right for driveways also. Is it after 1 moth those 4, 000 psi, or after 1 week? Most probably after one month curing I reckon.
By Rado
Rado
The concrete is 4000 psi after 28 days. I poured the insulating layer yesterday and trust it will come together, felt very dry!
Have been thinking about replacing the concrete slab with a layer if firebricks. Would orient them 90 degrees to the hearth floor bricks (but still on edge) to be more secure. Had thought about pouring some concrete around the border of it to hold them together and wondering if that is worthwhile.
I figure the bricks will provide more thermal mass and the are easier to carry than bags of concrete, only downside is cost.
Thoughts on using them and if I need to “hold them together” with a border of concrete?
Thanks
Grant
By Grant
Hi Grant,
Similar scenario is common, some ovens have firebricks placed on a flatbed layer of fine/loose sand. The concrete support around is a well thought idea, like a frame structurally.
HOWEVER between the firebrick hearth and this concrete frame there should be a gap filled with sand for instance. This is due to expansion of the firebricks when they are heated up, so it is needed loose around the perimeter of the firebrick hearth floor. Half inch on each side at least. If it looks bulky, it’s good/better!
By Rado
How long do you suggest leaving the insulating layer to dry/set up before pouring the dense concrete hearth slab on top of it?
By J. Parker
After finishing the thermal insulating layer, I give it two days before dissembling its frame-box and I make this top concrete slab for the firebrick hearth in the same day. Sometimes in a colder weather the insulating layer might harden a bit more slowly; you could still pour the concrete slab on top in such situation BUT would be vise keeping the boxing frame still in place until the corners and edges set firm. This is a straightforward work.
By Rado
Hey Rado, No sure how this came out. So I have the 60 lb bags of premix, yield is .45 cu/ft or 12.7L per bag. It is the high strength mix suitable for driveways, I sort out the 4:1:1 ratio by adding the 1 part as quantity in volume. The bag is pre-mixed 4:1, and then to this original a new 1 part lime is added to that.
Hypothetical meaning: the 4:1 makes it 5 parts, so adding 1 extra part of lime in volume makes it 5:1 = 4:1:1
Example: 5 cans of pre-mixed concrete from the purchased bag/s to 1 can of lime. Took me a short time to figure this math out.
By Vince Nylin
Rado,
thank you so much for the specific details, i start the project.
I finished up with the base and flat bricks, a few days ago I mix the vermiculite and cement, check this morning it is a bit spongy, guess I need to wait longer to get it set more.
I will keep you posted, and show you some photos also.
Take care,
Francesco
By Francesco Gaudino