Wood burning oven: building plans,
tutorial with pictures.
Building 'Swishy wood pizza oven', page 2.
40 pictures just on how to make a concrete slab, from the ground leveling, digging the footing out (2020mm x 1655mm slab 10cm thick and footing 30cm deep x 30cm wide), putting wooden forms/boxing together, use of reinforcing metal rods for footing and metal mesh for the whole slab surface and the concreting job itself.
Does it sound complicated? Nope it doesn't.
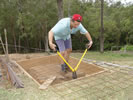
Cutting reinforcing mesh for the base concrete slab.
You can mix the small quantity of concrete for this oven job at home by using a small cement mixer. I always do it by myself and (in this instance) I also had time to play around with the photo camera. Heaps of enthusiasts mix their concrete by hand, successfully, simply with a shovel ... I know: Wow.
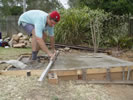
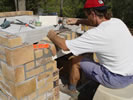
Marking the surface for both walls and laying them.
Directions on laying outside building brick wall and the Besser block wall for the wood burning oven hearths concrete slab. Don't get scared, it's so easy and a good fun project. You wouldn't be the first person who mastered wood oven building; people have been making them for centuries. Besides, the oven is small, not like a house. Look at the above picture, in surface area it's smaller than my bed. As I was building this wood fired oven I couldn't even rest on it properly.
Assuming you sit behind your screen now. Turn on your chair sideways and on the floor make approximate mental image of a rectangle of 2 x 1.6m (less than 7 x 5 1/2 foot). That's the surface area of the oven, small isn't it(?!), but the will oven cooks much better that good... And now compare it, the rectangle, with your room size. Can you do it? I heard you saying "sure I can Mate" F'yes ... why not Mate ... ye ye anytime ;-).
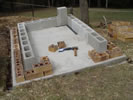
First level of inside and outside walls.
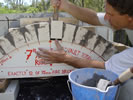
It's a great idea to draw lines on the base concrete slab to have a good visual image of where both the outside wall and the inner wall which holds the hearth's concrete slab will be. For the same reason (and also for you to see, of course) I then grabbed the required number of bricks and concrete blocks just to place them freely around to be sure everything was correct. That means with the marking lines and temporary practical placing of all bricks on their spots I double checked the base of the structure. WOW, what a champion I am ... heh, just kiddin' there!
I calculated the outside wall so that it would not be necessary to cut half bricks more than once on each ring layer. Each level of bricks only starts or stops with the halved brick which is quickly cut in half by using a wide brick cutting chisel and a single hit with a hammer- this you can see in the pics too.
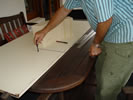
For marking on the slab, use a real building pencil and when not in use have it behind your ear, that's where it should be. You will not look for where it is all the time and you will look 'cool' ;o). It cost only a buck and it looks funky in jazzy colors.
How to support the slab's soft concrete? Back up heat insulation under the slab, and the practical ash drop/shoot/slot.
There are 36 detailed pictures on how to make the second concrete slab which holds oven's hearth and the whole firing dome chamber. From the wooden support to putting together it's framing, metal reinforcing, back up heat insulation and the concreting job itself. Use 2 reinforcing metal bars apart from each other on the side where the slab doesn't lay on the Besser blocks. There are considerable heat differences in this slab and the extra strengthening is needed.
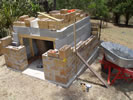
Laying outside bricks into level with the hearth slab.
I once saw someone making a slab hanging only on metal reinforcing bars sticking out of the hearths concrete slab. It was supported only on those metal rods. This can be dangerous. Make your own opinion of this, or ask any builder. You will be told this steel starts to corrode and the rust will travel inside expanding and eating these metal rods. The hip high hearth slab and the dome on top of it are heavy. In a heat conditions around this slab the steel rusts faster as gases speed it up, when it holds only on these steel rods and when the steel bars weaken it'll go down.
If you'd like to own this oven, but have no time to build, make me an offer and we consult further.
I will be delighted to hear any suggestions that you may have.
28 additional pictures show how to go about outside decorative brick walls of the oven, a good ideas, and a section with help for brick laying too.
Special stages of the arched brick work come in their own separate photo series and accompany those 28. Often people choose to use other materials. If you have a nice rocks around in your area it would be worthwhile to spend some time collecting them. I have granite rocks in The Gap area and a few quarries.
Making wooden templates for arch forming and using it.
Drawing a line for the arch template.
How to create a wooden template to form a brick arch for the dome or decorative brick front entry into the oven, and how to use this template in practice. Door from some unused old wardrobe or piece of a similar material will do perfectly for this purpose. After you draw the line that copies the position of all arched bricks, all that you have to do is to cut it out slowly so your hand pushes the saw blade straight along the line. Not that it would matter that much, but you want those fire bricks to fit as precisely as possible so you can say to your self, hey you did awesome job mate. Wait a second, who is mate(?), sorry ;-/, but I am here alone ... I am only joking.
Working with the arch template.
Many pictures focus also on applying clay-sand bed on which to lay all the hearth fire bricks in order to level them very easily. These fire bricks are freely placed next to each other without joining mortar. After this follows marking the brick hearth floor & 'quick on' placing the dome walls.
I started to form the dome using my wooden template. The dome is laying on top of the freshly made fire brick hearth. I took so many pictures of this again covering all details, if not more, that you could need for completing the construction. All parts are covered including the door height to dome height ratio calculation and the dome concrete 5cm layer applied which adds into the total ovens mass heat absorbing thermal capacity (that's for long cooking time and for more heat storage and even heat radiating across the oven).
Pictures show you how to cut the bricks easy and what to use. These days you can get a new grinder for only  35 and the very high quality cutting diamond wheel for brick dry cutting cost only
  15, each of these wheels will last for much longer then building one of such ovens as this one and that includes work on the outside decorative bricks. By the way, who knows where the first synthetic diamonds were developed? The answer is: The CzechoSlovakia.
How to create a fire brick dome.
... continue on forming the fire brick dome using your made up template, the more precise the template you make the more evenly the fire bricks will fit next to each other. They should touch on the inside to stop them from moving too much. You may need to tap the last brick in lightly for each round. Use a piece of wood to do this, a rubber hammer will work too.
Dome bricks touching each other inside.
Here you have 72 photographs for making the firing dome and the hearth out of the fire bricks. With this many detailed pictures and instructions, there is no way you could go wrong if you are about to build a wood oven yourself. These are all details needed to help you to form the whole dome and to complete whole oven.
The masterly Tail oven design plans (MTo) contain 1000+ long photographic sequence. The new MTo contains 4,500 images sequence, all angles to see are covered perfectly.
To use fire bricks is the best option to build a proper dome firing chamber for the wood burning oven. It will last you ages. Refractory fire bricks have great thermal properties, will not peel later on, and will not develop major cracks as the whole dome is fragmented- everything nicely moves. Those could be words of my grandfather. Those could be words of my grandfather.
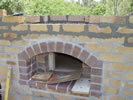
Making precise entry brick arch.
I used dark red bricks for the entry decoration, the rest of the oven is white. Detailed and precise work on the facing front arch.
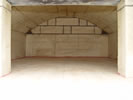
Important gap space between the dome and the outside front wall !
Notice the important gap between the dome and the outside brick deco wall, this includes the front wall as well. Look at the gap which is filled with backup insulation. The dome and it's slab can not lean against the outside walls; it expands slightly and the wood oven would develop cracks on the outside if the outside brick walls were touching the dome and it's support slab. I have seen ovens with up to 2mm cracks when in use, as they cool down the cracks close. But it's upsetting when it happens through the front deco face work.
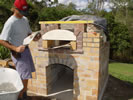
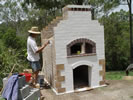
Now the structure started to look as wood burning oven.
Now the structure starts to look like a wood burning oven.
How the flue turns into the chimney?
Wait, after I finally finish this writing and hopefully say something, I will count the number of pictures that show how to actually make the chimney. People ask me for chimney plans a lot, after the chimney come questions about the firing dome (how to build the dome and out of what etc.), I've been asked a bit less frequently about the hearth and brick arch jobs. But the chimney questions come up far more often.
No wonder, it's as important as the dome height in relation to the door height, and could be quite hard just to imagine with closed eyes. I think I took as many pictures on how to create the chimney as I took on the wood oven firebrick dome. You will not need any more to understand. I even climbed up on top of the dome every time to take a snapshot from the top view. People like it because it gives them all the answers they were searching for... I was lucky it wasn't very windy it would mess up last traces of hair left on my head.
Chimney is now ready to rise up higher.
I realized that this visual Tutorial for building this brick oven should include as many pictures as needed as well as instructions for building, it's a complete visual building tutorial.
This Visual Building Guide uses pictures rather than lengthy explanations to teach and explain construction stages. You'll be up and running in no time!
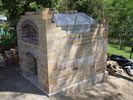
Applying the back up heat insulation
Applying a back up heat insulation.
This back up heat insulation is necessary for preventing the heat escaping from the dome walls through the top - this would be the wrong way to send the already beautifully generated heat away. We want it to radiate only inside of the dome chamber where we need it for cooking. Well, this is the last stage of creating the oven dome, you will realize it wasn't that bad or hard to get up to here.
NOTE! Allow 2 weeks drying time for the moisture in the fresh dome before you set a fire in it. Then you should start with only small gentle fires to complete the drying process before adding more firewood inside.
I receive many emails from people saying they can not track anyone who stocks firebricks or fire clay, vermiculite insulation, refractory cements, etc. Most suppliers can be closer to large industries using heavy refractories for their large industrial kilns and furnaces. For this reason I decided to make a list of "Equivalent Materials and Sources with Photographs" with description how to use or obtain them to be able to build or save. Photographs again are included for better assistance. You can print it out and read in the evening, some interesting search/thinking is involved.
Painting the oven walls white.
Brick joints left looking rather rough. This gives the wood oven that sort of character. I only cleaned the unpainted bricks with water and a sponge while the joining mortar was still wet. The whole oven is painted a white color and the paint used was the same as was used on the house. I didn't have to buy it, it was left over from the last house painting job.
The same applies to roof tiles, the house roof has got the same.
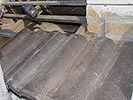
Pictures on tile roof building.
Let me know if you experience the same phenomenon that I describe here. There is a strong chance you well may feel the same. You don't need to say to me I was right, I like to mention it here coz I recon it could help you too. As with houses and other buildings, the roof on the oven plays a big role in overall aesthetics. People do beautiful jobs building their own brick wood pizza ovens at home. Although in some cases as they get to this point they naturally like to finish quickly to have the oven working for them after all the effort. Maybe they also get a bit tired too. What happened was that the roof looked as if done by another person, a bit different image effect when you compare the roof with the rest of the great work. If you feel the same, you could take a day or two off to contemplate the roof job, just juggling the mental images.
If you decide to follow my roof design as the last stage of the whole adventure, thank you. That brings you a new useful item for your property.
How would I use this wood oven?
With this oven, organize a pizza evening with your friends who will stare into it like into a window of a fancy shop that is closed, 'Oou, pity, we can't have it'. Then have some Lamb leg roasting on an ordinary stainless steel stick leaning against the dome chamber wall. As it's juices drop down into a pot with many vegetables (place garlic into small cuts in the lamb meat!), place around also some sausages straight onto the oven floor. OK, fine, blah blah, you all have a great dinner, right? And what about me.., no worries just joking again.
When you finish cooking for everyone, leave the embers die out slowly and if you didn't drink too much vino, I presume, you didn't forget to close the door as well. Why? Because you only woke up your visitors a minute ago, it's morning "hallo", and using the stored heat in a well built oven from the previous night, you are baking bread for the breakfast and some lovely cakes as well.
At present this web site is on a hosting plan with a low download limit per month /bandwidth/. I plan to upgrade to a better dedicated server hosting package or set up an own 'DELL' server, that's my main aim for TO website. It might take some time, but then it'll be possible to add/enlarge many more pictures than there are currently.
![]() by Rado Hand
by Rado Hand


