Brick oven with temperature gauge
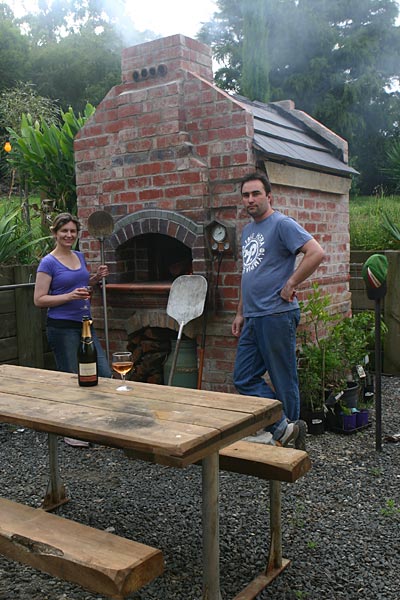
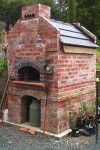
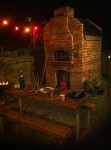
Thought I would share with you some photos of my pizza oven built using your swishy oven plans (with a few mods). We have had some great pizzas, bread and roasts out of the oven and I have really enjoyed the whole process of building the oven.
We use it about every second weekend. I would love to build another one somewhere now – bigger than the MTO. Would love to get my hands on some plans for a scotch oven.
The concrete that covers the fire bricks in our oven is actually more than what was specked in your swishy oven design, more like a tonne of concrete! It does take longer to heat up but stays hot for days. Insulation is ceramic fibre blanket, board and vermiculite.

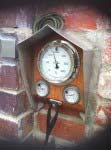
Swishy design but half a brick longer on the inside and the outside wall is two bricks higher on the sides with a slightly steeper roof pitch. It has three thermometers; one extended on a capillary tube reading one inch, three inch and five inch deep from the inside in the masonry. That lets you easily gauge the oven temperature and performance. I also use an IR gun to get it perfect.
Full credit to you Rado for your website, information and general enthusiasm.


So this is my red brick oven with a temperature gauge. You will hear from me much more.
Cheers,
Jamie
Respond to the Brick oven with temperature gauge article:
32 Comments
Sorry, the comment form is closed at this time.
Hi Jamie, nice oven build, congratulations. The way you played with bricks to create features is effective. Also good idea with the red bull-nose stair clay pavers for the pot surface in front are pretty adequate to accomplish that purpose. The oven has a nice character so, worthy outcome.
Questions regarding your thermometer Mate! Already a couple of people asked about … Where did you buy the thermometer gauge? Or if it’s an older product, where does it come from, how was the item originally used? I’ve noticed that you’ve made some precise calibration marks on it to read your firebrick chamber atmosphere with better correctness, for some roasting/baking? Thank you…
By Rado
The temperature guage was ordered through our local hardware store, BJ Bearings who got it from Ambit Instruments – check out ambitinst.com.au and I believe they imported it from the UK somewhere. I just told them what I was after and they got it sorted for me but it did cost a bit. Can’t remember exactly how much (around $150 – $200 I think) but I do remember getting in trouble from my wife for spending so much on this particular item. It is really handy though.
Cheers,
Jamie
By Jamie
Hi Jamie,
I love your oven design, and think the three faced thermometer is the icing on the cake. I’d love to get a similar (if not the same) one for an oven I want to build this summer. Problem is I cannot find a three faced thermometer anywhere (not locally, nationally or even online). I can’t find it on the site you link too either. Being UK based I’m hoping I can find out the name of the exporter so I can see their range of products – can you remember anything else about it that would help?
Also, any tips on the placement of your thermocouples? Where, how the wires were laid out and how deep/positioning of them?
Many thanks,
Duncan
By Duncan
I’ve been in contact with Ambit Instruments and they’ve informed me that they don’t supply this product and that it must be another supplier to BJ Bearings.
Could anyone in Australia near a BJ Bearings store please ask next time they pop in?
Many thanks,
Duncan
By Duncan Meyers
Hi Duncan,
The two smaller thermometers on the bottom were just purchased on ebay. They have a 300ml spike on the back of them. Where they are positioned in the internal heating block is where they are reading from so they run directly from the face straight back. The larger thermometer was purchased with a 1.2 metre capillary tube so it’s flexible and you can bend the sensor into the position you want. I pre-drilled a fire brick on a pedestal drill without going all the way through, measuring it to one inch of the other side. I ran the sensor to the centre of the oven about half way up the dome. You could vary the positions of your sensors and could even put more than three. You could put one on the floor for instance but it has to be done as you build the oven, not after.
I mounted this on a piece of hardwood timber using a hole saw and a chisel. I then wanted to fashion a stainless steel hood to protect the face from excessive moisture and sun etc. Keeping in mind how you might like to mount this to your brick wall, I then cut out and folded the shape of the hood to fit around my timber block. I then took this to a sheet metal fabricator and they folded it for me. I then drilled a few small holes in the back and using a couple of screws I fastened the timber block to the inside. I used a couple of brick ties as I laid the bricks to tie this into the brick wall in it’s correct position before I poured the final concrete cap on the oven. I now have three different temperature readings at three different depths. Every oven is different but this allows us to get to know our oven and read it’s performance under different conditions (baking, roasting, pizzas, bread etc).
I’m sorry I can’t get you any more information on the actual source of the big thermometer. BJ Bearings may have a record of the purchase, I will try to find out some more for you.
Thanks,
Jamie
(Page with thermometers on eBay.)
By Jamie
Hi Duncan,
I believe you must have spoken to the wrong person in the right company! Ambit Instruments definitely manufactured this thermometer – their name is printed on the face of the thermometer! It may be that it was not the Australian subsidiary that supplied it, I suspect it was from the UK.
Cheers,
Jamie
By Jamie
Hi Jamie,
I think you solved a problem many of us face in finding a decent thermometer for our brick ovens.
I went to the ebay link you have above. I was not able to find any thermometers that read higher than 600 degrees Fahrenheit. Do your smaller ones read higher than that?
Also, like you, I built in a thermo-well in the bottom of my oven floor. I drilled a hole up into the bottom of the firebrick, stopping about 15mm from the face. I have a thermocouple to reach a place I prepared outside of the oven. I have never been able to find a suitable temperature display (classy like yours). If you find any more info like a model number, please let me know.
Thanks!
By Steve
Jamie,
What a great job you have done. Congratulations.
Can you please tell me what bricks you have used. They look old but they may not be.
Geoff
By Geoff Cohen
This is truly a gr8 looking brick oven possibly the best I’ve seen so far, how do I get my hands on the drawings for it? Regards Dave.
By Dave
Hi Geoff,
They are quite old. They are just red bricks with lime mortar. They were knocked out of a wall of a shop and I had to clean them myself but they were cheap – they cost me two slabs!!
The darker bricks I purchased new from a brick supplier. There is a run of lighter coloured bricks near the bottom that I salvaged from somebody’s paving.
I think if you can find something you like second hand, the older bricks look more effective than the newer ones.
I got my inspiration from older, industrial brick buildings from the 1930s and 1940s but that’s just a personal thing.
I did get new tiles for the roof too. I liked shingles but found these ones were similar to what you might find in an old convict building in Tasmania and that appealed to me as a “look”. They are boral flat tiles.
Cheers,
Jamie
By Jamie
Dear Dave,
The drawings are Rado’s swishy oven plans. All I did was modify them a bit by adding one half of a brick (you can see the chimney protrudes by half a brick at the front). I also extended it a bit out the front where the pizza goes in as I used pool pavers which are a bit longer than the ones Rado uses in his plans. I cut bricks in half and stepped them apart above the lower arch and reinforced in between with concrete, wire and metal reinforcement bar to get the desired thickness to support the pool pavers and the extra half a brick of chimney out the front. I hope this makes sense!
I kind of just moved bricks around and sat them in place and then worked out what I was going to do next to make it work.
Otherwise it’s pretty true to Rado’s plans – that’s what I worked off.
Good luck with your oven building.
Cheers,
Jamie
By Jamie
Hi Steve,
The large guage goes to 600 degrees celsius but it is positioned about one inch into a fire brick near the top of arch. Realistically you only need about 350 degrees celsius at that depth because if it gets any hotter than that you won’t be cooking anything – you will be cremating! The relative temperature on the inside of the oven would be a lot higher.
So you might be thinking – why not have a thermometer than measures direct into the oven? It’s because I’m measuring the stored energy in the bricks and as the heat travels through the block towards the outside it diffuses and does register on my other two (smaller) gauges. These will always be lower the further you go out. 3 inches deep commonly sits at 75 degrees celsius (167 degrees farenheit) and the outer guage 5 inches deep sits at 55 degrees celsius (131 farenheit). When I have these readings I know I have the oven fully heat soaked in the block and it is far easier to control the internal temperature of the oven with a small fire or coals because the heat radiates out of the bricks constantly, evenly, slowly and for very long periods. My oven which has more concrete than the swishy plan stays hot for three days. Of course the inside of the oven will cool down more rapidly, especially if the door is not in place but the bricks will retain their heat and slowly taper off. This allows you to do pizzas on Saturday night, a roast at 10am on Sunday, bread on Sunday afternoon. On Monday if I light a small fire I can be up and running again very quickly.
The most inexpensive and versatile thermometer that I use to check various parts of the oven (I am a gadget man too!) is a Dick Smith hand held infra-red thermometer which gives me celsius and farenheit readings with a little red dot laser for aiming. This costs about $100aud. You can probably get cheaper than that. That way I can measure the bricks, the tray, how hot the pork crackling is or whatever I want.
You don’t need guages really, once you get used to your own oven you will know without even measuring. A bit like the old bakers used to throw the flour in and see how long it took to brown to measure the temperature. The guages, apart from looking good, just give you another point of reference and another way to monitor how your oven performs in different conditions of heat soak.
Cheers,
Jamie
By Jamie
I thought about starting my very own wood fired pizza oven blog too but I’m just too lazy at home so, I guess I am going to just have to enjoy the perfect cooking and baking in my oven and keep checking yours sight out. Beautiful work, well done.
By Kevin - the baker and pizza cook.
Hi all
I have witnessed the Jamies oven first hand and it’s amazing. Cooking heaven.
Green with envy I have now started an oven of my own similar to Jamies.
A long way off ready so I will have to around and have a drink and admire his for a while longer.
Cheers,
Clinton
By Clinton
I’ve just come across a web site I haven’t seen before, may be worth a look. I’m sure there are many more. I will send some photos to Rado to explain also visually.
Futher how to build and mount your custom temp gauge. The site was Pyrosales.com.au be sure to get a set up for food purposes, no mercury or lead.
Make it a large face and stainless steal, give your self plenty of tube when you order
at least 1.2 meters (4 feet) more than an arms length. If you drill your sensor into the brick to be positioned at one inch deep from the internal chamber, you will only need 0 – 600°C celsius max or 1112°F fahrenheit max. Hope this helps… It won’t be cheep but it will be good.
By Jamie
We admire your brick work Jamie. Our attempt is to do something similar. Even if it takes a few extra days. Thank you for sharing.
By Heather and Jim
You mentioned building a larger oven. We are planning to build one at our Inn in remote northern Maine, (USA) this April. Would you be interested? We’ll provide the lodging and more.
By David Surprenant
I am genuinely tempted! However as you can see on this site anyone can build a quality oven, and make it unique to the place. When I test my new hybrid design and it works I will let you know. I would recommend Rados MTO Design. Thank you for your kind words but at the moment I am over committed. Search images for a Scotch oven, generally 1880 vintage and weighing in at 75 ton of bricks then scale it down to about 20 ton use old construction techniques and add modern insulation over the top.
Good luck.
By Jamie
Hi Jamie,
any tips on sourcing fire bricks in Victoria?
thanks
Andrew
By Andrew
Yep I got them from Buildpro. I bought some seconds. I paid about $3.50 per brick. They were slightly overfired but straight as a die and in really good condition. You see a lot of people selling them on ebay now. Try enquiring at any bricking yard and see what price you can get. Avoid second hand or furnace bricks because you never know what they’ve been burning in them. Also there are pressed clay bricks that have been fired to 1500-1800 degrees celsius that we’ve been experimenting with and they seem to work pretty well. They absorb the heat more readily than fire bricks but don’t necessarily reflect heat as easily. The pressed brick that we’ve used has a similar texture to the fire brick.
Sorry for the late response I hadn’t checked in for a while!
Good luck!
By Jamie
Can you send me some specs on building an oven like this one?
By dritan shatku
Hi Dritan,
It really is just Rado’s swishy oven design (he will send you the specs). My modifications are these:
1. It’s half a brick deeper on the inside which results in the chimney “stepping out” by one half brick.
2. Pool pavers are used in the doorway of the oven to assist in stepping the chimney out (they are the orange rounded edge pavers). The bricks below that are simply longer and stepped.
3. The top of the oven is a couple of runs taller on the exterior walls.
4. The temperature guage (see http://www.ambitinst.com.au) was added as an extra (see comments above). We’ve ordered guages from these guys a couple of times. If you get onto the right person they take about 6-8 weeks to come in. They have to be manufactured in England.
That’s basically it. Get the swishy plans from Rado….
Cheers,
Jamie
By Jamie
Awesome oven! I am in TN and i have not seen any brick ovens around these parts. So, i am real interested in a project like this and i love pizza. I would like to look at Rado plans myself. How do i contact this individual and what does he charge for the plans?
By Russ
Nice brick work Jamie! What are the round objects near the top of chimney? They produce quite nice effect. I am getting similar colour bricks.
Russ > all info for Rado’s plans and how to obtain the DVD can be found on this page, the link is up in menu > “Building CDrom Details”
https://www.traditionaloven.com/pizza_wood_oven/pizza_oven_3.html
Pete, A.C.T.
By Pete
Hi Pete, they are the older style terra cotta drainage pipes. They are not the sewerage size, they are smaller. I found them on our house block. I’m not sure where you would go about finding them. Maybe somewhere that specialises in older style terra cotta roof tiles. As you know, you could use a multitude of things to get a similar effect.
Hi Russ, see the link that Pete posted. Rado’s plans are the best way to go. Good luck with your oven. It makes great pizza but that is just the start, the roasts, curries & breads that come out of the oven make it such a great asset.
Thanks for your comments.
Jamie
By Jamie
Hi Jamie,
I am sorry if I’ve overlooked this on here but do you have any stage by stage build images of your oven? Love your oven!
Cheers,
Andrew
By Andrew
Hi Andrew,
I have heaps of photos of my oven at various stages. I wouldn’t be able to upload them all! Are you interested in anything in particular?
Cheers,
Jamie
added by Rado:
Hi Jamie,
I will upload all of them if you would like me to. Even your own photos’ descriptions under each picture if you have time to type it. Would you be interested in delivering your images to me somehow? E.g. in more emails or on a disk? Best of large/original size as they will stay nice and sharp when uploaded.
* So far I haven’t come across any such good character meters…
By Jamie
I am going nuts trying to find the large gauge that you are using. Can you give me the contact information of the B J Bearing store, I am located in Villa Rica Georgia.
By keith willis
Sorry Keith for the late reply, this is for others as well.
I ordered the thermometer from Ambit Instruments Pty Ltd in Australia. I believe this is a world wide company and I believe the thermometers are manufactured in England.
I ordered 2 more very recently. Here is some information:
It takes around 7 weeks to manufacture and import to Australia.
Email contact is: contact@ambitinst.com.au
The Melbourne phone +613 9776 8888
Just a reminder on my oven I installed it 1 inch deep into the brick from the inside so the hot face is not in direct contact. It is sampling the internal brick temperature 1 inch deep from the inside of my oven. When used with one or more thermometers at different depths in the masonry and sometimes positions it is possible to gauge how much baking time, how much energy is stored in your heat bank. For instance when my main gauge reads 250 degrees C = 482 degrees F and the 3 inch deep gauge and the 5 inch deep gauge read around 50 degrees C = 122 degrees F, I know I have got a near optimum heat soak in my bricks allowing me to control the internal temperature of my oven with a small set of coals toward the back of the oven, I can put a few small pieces of wood on those coals and flare the internal temperature of my oven up dramatically and radiate heat down from the top of the oven to do a pizza for instance or I can leave the coals low and bake or roast meat for a longer, slower period of time because of my heat soak. The best way to tell the immediate internal temperature of the oven is with an infrared temperature gun. Different parts of your oven will vary but I find that knowing I have a full heat soak in my bricks allows me to control the fire or coals or even if you pull the fire completely out, determine the amount of time you have to bake. If you know your oven well enough you will not need a thermometer to tell you when this is right. But how cool is it!
Good luck to all – more links to come.
By Jamie
Where can I get a thermometer like this?
I have great urgency.
Thank you.
Nuno Dias
nuno.afterstageREMOVE@gmail.REMOVEcom
By Nuno Dias
Loved the oven. Starting my project soon do you have a link to Rado or similar plans. Many thanks Paul.
By Paul
Hi Rado
Where can we get a hold of your blue prints/instructions for the oven.
My wife and wish to build one this spring. We are in TN -US
Many thanks
Roberto
By Roberto