My First of many retirement projects
Hello Rado
I realize that Thanksgiving is an American holiday only, but roast turkey in just about any country is delicious. I recently cooked a traditional Thanksgiving turkey – complete with stuffing. It turned out perfectly. Actually all meals, breads, pizzas, etc. that I’ve cooked in the oven have turned out perfectly. There is something about the high quality heat from this oven that helps turn out meals that are tender and moist, without burning.
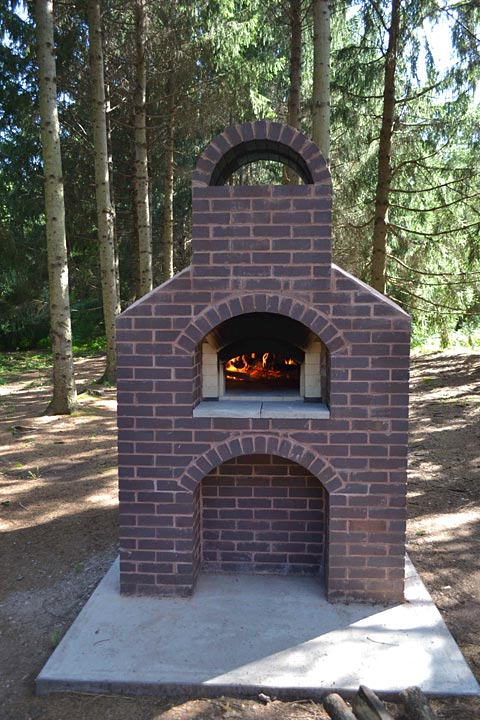
The energy inside these clay brick ovens behaves somehow differently because all meals cooked in them taste a lot more lovelier. That can be clearly visible. The first pizza was done in 90 seconds. I love my oven!
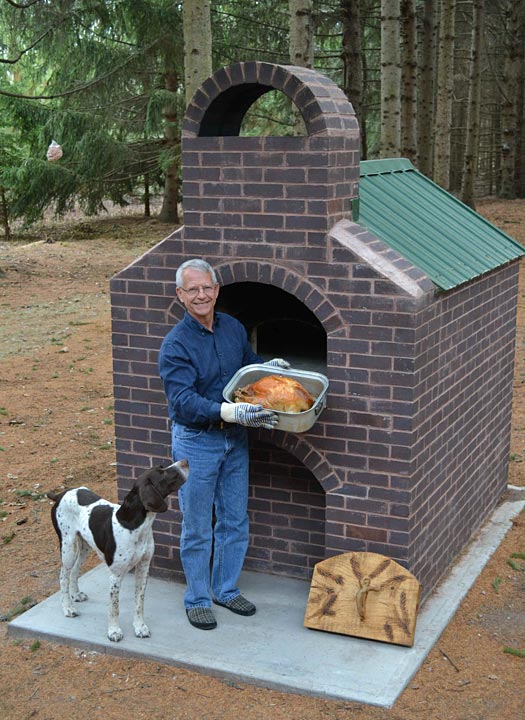

I was able to locate 1,120 new house bricks on Craig’s List for $75.00 US only, < 7 cents per one brick. I have about 20 bricks left. Guess that I cut it pretty close. I've laid brick only once before (about 35 years ago), but it came back to me.

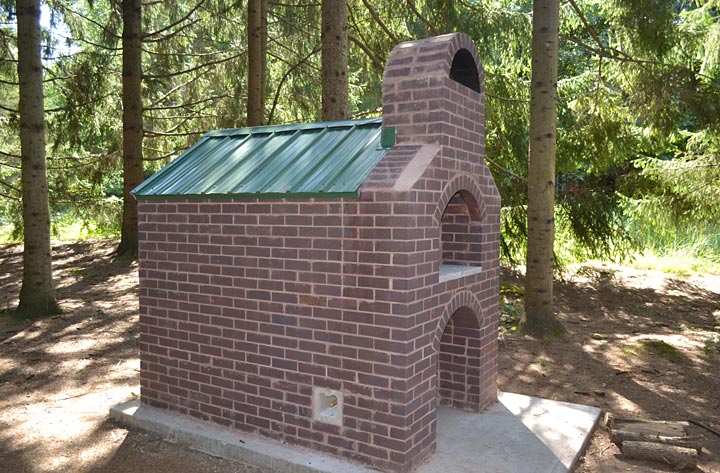
We’ve been traveling ourselves, but I finally got around to taking a few more pictures. I have plenty of more photos that I took along the way and can send you some if you have a particular question – I made a few construction revisions along the way. Since I had an abundance of house bricks (from the same batch), I wanted to keep both the design and look simple. The hearth will change. I eventually plan replace the two concrete slabs with a piece of marble. This is the first of many retirement projects. It’s been a good fun getting to this point – some puzzles along the way, but I’m almost there.
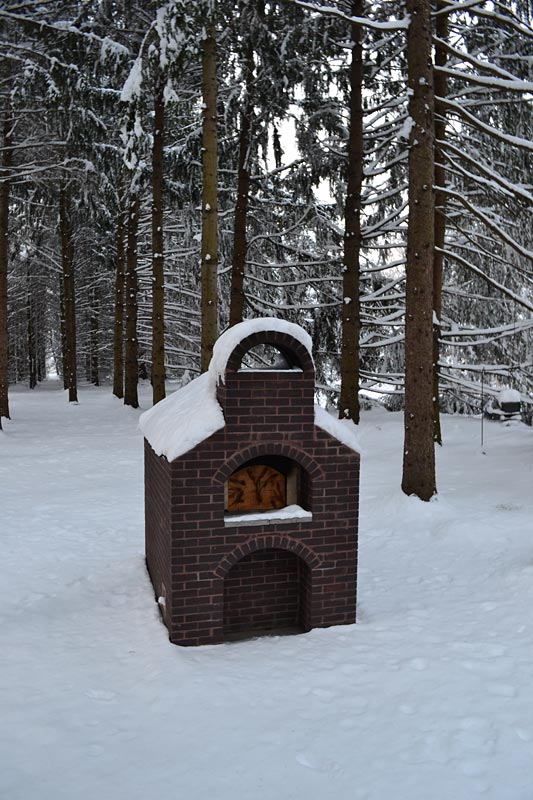 Thanks again for the plans! And for the advice on firing up the oven a couple of times before cooking. I had fun building it, and will have even more fun using it. Later I’ll send you a picture of the oven after our first snow fall of the season.
We just returned from a vacation. We left sunny Florida, and returned to the first snowfall of the season in Wisconsin. Cannot wait to fire up the oven.
If you need any more information, please let me know.
Mike
Prescott, Wisconsin US
Respond to the My First of many retirement projects article:
10 Comments
Sorry, the comment form is closed at this time.
Mike: I have noticed that near the front and top part of the oven the bricks have been cut. I know that in buildings they do it for frost. Is this the reason you did it and do you think its necessary? Right from the very beginning Rado mentions the 10 mm gap from the foundation, so that makes me think.
Well it looks like you have my taste as to the top of the chimney and style of roof. That is exactly what I had in mind, except roof come up to the edge in the front. If I can find also european style clay roof but in vynal. Thank you.
By Bart Parete
Hello Bart
I’m not sure exactly what you mean. Actually there are two different structures – the oven itself, and the outside dressing (the red brickwork). I’m assuming that you probably mean the red brickwork. I think that I remember Rado mentioning that building an oven – especially the outside dressing, is an evolving process, which it truly is. If the cuts you are mentioning are on the outside dressing, I can tell you that there is probably no particular reason. As I built the outside structure, things just fell in place. If I needed to make an adjustment to my plan, which I often did, I tried to make it in a way that kept some semblance of aesthetic balance. I would guess that everyone that builds one of Rado’s ovens, ends up making unanticipated changes along the way. Good luck with your oven! It’s a labor of love, with high levels of satisfaction awaiting you at completion.
By Mike Halverson
Hi Mike: Ok you have a picture of the oven with a side view. If you go the 3rd brick from the front top, the first 9 rows seems that you cut it. In factories they usually do that for frost every so many feet. Since Rado doesn’t say anything about it, I thought you did it by past experience. Anyway I love it like I said it’s exactly what I have in mind of doing. Yes it is labor of love. Happy cooking.
By Bart Parete
Bart,
Nice spotting! This way it also makes the entire flue hood with the whole hot air passage as a separate entity. Can be done that way; I didn’t know that it’s being done in a similar way as for coping with frost – probably to absorb a long the wall movements as it’s changing size in different weather temperatures — at the wall’s ‘top edge’ mainly. Makes sense. Will you do that also at the back, in the middle perhaps?
* Mike emailed us a fresh photo; the whole place covered in a beautiful layer of snow (the whole ground, all trees, his oven, under white snow cover.) I will add that lovely photograph as soon as I get back home.
By Rado
Ahh – now I understand what you are looking at. That is a good spot. I’m afraid that there wasn’t any great science involved. This is one of those evolving changes that I was talking about. I varied from Rado’s plan by running the concrete mantle all the way across and then building up two walls (front and back) for the flue hood. By doing so, I created a situation where there was a break in continuity of the brickwork around the oven. There are probably different ways that I could have adjusted for that, but building the chimney flue up as almost a separate entity seemed easiest. The whole front of the “outside dressing” (below and above the mantle) ended up being a solid structure. I filled in the side areas below the mantle with large concrete block (12x8x16). I filled in the side areas above the mantle with scrap brick. That is why the brick and mortar cap is on either side of the chimney, and the metal roof starts behind it. Hope that makes sense.
By Mike Halverson
I don’t think the unit is that big for the frost. Usually they do this to factories where there is not that much insulation on the inside. They make this cut about every 15 to 20 ft. In the case of the woodburning oven I am lost. I noticed Mike and thought that maybe he is on to something which I did know. What do you think as for the heat, would you do it?
I have already built up to the hearth slab and firebricks is the next step. This would be in early spring. Thank You, Merry Christmas.
By Bart Parete
Lucky, I have been looking for cheap bricks in Southern Oregon and even on Craigslist people want 40 cents per brick. I need a few thousand bricks for my project but I love your oven!
By steve
Hi, do you have step by step plans or pictures?
By Flor
Hello Flor
Sorry – it’s been awhile since I checked this site. I used Rado’s plans exclusively, except for the changes I made along the way. His plans are invaluable. Without the 1,000 photos and instructions, I would have been lost. I’m sure that Rado can do an oven fairly quickly. It probably took me 500 hours to do mine. No regrets though – I would do it all over again.
By Mike Halverson
Do you have building plans that you’ll share on the brick oven?
By Richard Davenport