Wood burning oven: building plans,
instructions, tutorial with pictures.
Download all 3 designs, pick one and start planning your oven.
PayPal handles the transfer for you free of fees, basically I pay those. You will have option to write me a short note in a text box. Your message will be attached in the email for me e.g. "Rado, we will email you a photo of our wood oven when cooking." etc., (or whether you prefer to receive it on the phisical disk instead, if so include your shipping address.)
* I will replay promptly with my confirmation email which will include the download link(s) OR info about the Cd's being posted to you (plus, of course, my further thank you!).
** If you'd like to make any changes - you can also reply to your confirmation email from PayPal, that will have my recipient email address. Thank you very much.
|
US Dollars |
Australian Dollars |
Canadian Dollars |
|
Euro € |
Pounds Sterling |
New Zealand Dollars |
Yen ¥ |
Regarding the oven building workshops by download via received emailed links (or on cd's shipped in mail if preferred), basically; for all world's destinations it's $6.50, that covers expenses to send the oven building cd out by priority AirMail or by download (from Amazon S3 servers). This page below gives more details also on my second and third workshops for building the Masterly Tail oven designs. Paypal buttons are here. People at times donate to the website cause, basically I include the original MTo designs with the latest MTo design automatically to everyone who supports with $30+. For that amount of support you will receive all three designs, thanks. You will receive a confirmation email from me with my further thank you.
With my PayPal Business Account I can very easily send or accept payments online. It makes posting CD's faster. No need for you to register with PayPal to send but for receiving CC's payments or to become a merchant the best are Premier (personal) or Business accounts. They are free and easy to set up worldwide, connect for electronic transfers with your own bank account, and include tools for quick website implementations (or in email), and they are safe for managing any business.
Why should I give something back (some may ask)?
These are those original plans, and with the newest design added, for building wood burning brick ovens (which can be seen around and on the web in great numbers), being mailed out to people since the year 2001, for baking breads or cakes, roasts and pizzas, dehydrating, entertainment in your own home backyard, garden, and for business activities.
"... if you can help me shoulder the cost of running the site ..."
I am not trying to use the "open source" model to secretly sell stuff -- and I reckon I am a very honest person so I assume -- it is alright to say what I did.
Very good but it is difficult for me to have a non-commercial site. I think all of us on the web now realize there is a cost for things and time.
Here under you can read a heaps more text, I wrote it in 2001.
Building the 'Swishy wood pizza oven', page 3
You can build your oven the same size as this one or, by adding in or taking off a brick or two from a side, you can freely change its proportions to what better suits you. It's as simple as 'Lego', it's all done with the brick count. The same with the outside oven decoration, express your creativity there too. BUT, the oven described in this tutorial makes a perfect home wood burning oven which anyone would swim a river full of crocodiles for.
Not much measuring is needed except for marking lines on the ground concrete slab in order to start raising the inner and outer brick or block walls. All is done mainly with that initial brick count. Measurements are in both, Inches and Metric.
Main size:
Total ground surface area: 65" x 79.5" OR 1655mm x 2020mm
Internal dome size: 82cm wide x 92cm deep OR 32" wide x 36" deep
(add up to 4" or 10cm extra to the depth internally for the entry throat.)
This design is a wood burning oven that will be built to last for generations, with a firebrick dome which won't peel or crack down the road, and without any errors in its design. All it takes to build a better quality oven at home is a little extra effort as compared to a quickly built wood oven. Even if it's your first, if you are into it and build slowly like me, you'll find wood oven building to be a good fun.
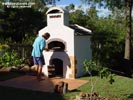
Have you looked for a spot to put the oven? Make it a main feature of the area so people see it!
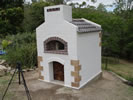
Garden brick dome wood burning pizza bread oven.
Would it help me to build a simpler oven ?
Understanding and having in hand the technical tasks and design for this oven allows you to work on the building stages separately and juggle them around any way you want. You can use just the dome design and build it in your garden, set low on the ground, giving it only a render finish on top, or build it inside your house. The same goes for the chimney or arched brick work.
If you'd like to own this oven, the CD is clear enough to DIY but if you have no time to build contact me and we can consult further on the job.
I will be delighted to hear any suggestions that you may have.
The first oven sequence has 370 pictures sequence for download (or the CDrom WorkShop versions are still being mailed out to people.) The second MTo design contains 1,000+ pictures long sequence. And the third, the new MTo, has the photo sequence 4,000+ images long - no angle of a brick or a block position view is missing in it!
The Download option or disk mailing option both are available ... more details are further below.

Brick oven with terracotta clay tiles and landscaping.
Would you like more?
OK, relax. All comes delivered by download. Also a complete WorkShop on CDrom is available. If also the second and the third newest Masterly Tail oven (MTo) designs are posted to you, then all 3 folders arrive in your place on one DVD disk (instead of 3 CD's). Place it in your computer drive and it will open.
What is in the download, or on the CD ?
Each of these original photographs is large, 72cm x 54cm (28.35" x 21.26") about 1.4MB file size for high quality printing, and you can zoom in for any tiny details. You will be able to slide show each building stage on your screen (on PC or Apple Mac) to find out about and see clearly what you may have thought was tricky to build, and ahead of time this will take you right to the building atmosphere.
The same is true for the MTo design; it includes 1000+ sequenced images, its firebrick part and other non-refractory features are very popular among oven users and builders. And the newest 3G compact MTo sequence is even larger. Get all 3 designs and see what is involved in their construction in order to decide which one to build. You can easily slide show their images on your screen.
More description of content is below:
- * Precise multiple-angle details show you each building stage clearly. Every aspect is covered, from finding the spot and doing the site work, to pouring the base concrete slab, rising the walls and handling the building bricks, reinforcing and pouring the concrete slab for the fire box/hearth slab, making the dome with a chimney, through to the finishing of the roof.
- * Placing hearth floor bricks on the concrete slab, forming the hearth.
- * Brick by brick photos to create firing dome using a wooden template and how to make this template. Applying refractory mortar between the firebricks.
- * Every angle of the flue and how to construct the chimney. A to Z from the first chimney brick to the last - with internal focus shots as well. It is important when you build the oven to make the flue vent with the chimney correctly as they draw off and direct the exhaust smoke. Well designed ovens can be built and used in a freshly painted white bedrooms, with no danger of smoke getting into the room, and that applies to this oven too.
- * Dome chamber and entry door construction, you will notice important door height to dome height (vault) ratio measurements for proper fire burning and efficiency.
- * Outside arch decorations and how to make the important gap space between the dome and outside skin walls to avoid cracking! Roof construction, how to achieve a good-looking design! Or the right oven character.
- * Thorough list of required materials needed with quantities for each to assist you with material collecting/purchasing before you start to build the oven. (when ordering, order all at once to save bucks, time, energy.)
- * Refractory Mortar mix ingredients and recipes for joining the dome firebricks, you'll make every mix yourself easily.
- Mix for a so called 'clay sand bed' on which you place the hearth firebricks to nicely level them up.
- * Back up heat insulation recipe and application for an evenly heated oven and efficient long cooking time. Or ask me for another 'trade secret recipe' when building.
- * Drawings, diagrams with measurements for raising both- outside building brick and inside dry-stacked cement block walls and the hearth slab. Basically it's a full workshop. Don't worry there is not much measuring going on, all is done mainly on the initial brick count with lines marked on the ground slab, from there it all takes the proper shape.
._._._._._..:: AND QUALITY ? ::.._._._._._.
I answer this question with another question. Have you seen the details on the Queensland houses I make, or what do you think about this website? If you build an oven yourself, you will find my help very useful. Then after building remember this website, email us photo(s) of your oven when cooking, many people find them very interesting. More than twenty thousand disks/downloads were sent out already. Builders emailed us more than five hundred different ovens' pictures, which they've built at home or for business. This website is 10+ years old now. Loads of people visit per day. Originally I started it (though first I had to learn how to do the online work) to get better crafting-jobs or jobs closer from my home. It was worth every penny and minute of time because it works for all parties not just for me.
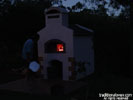
Chimney cap made and we fired oven whole day in rain
How much does it cost? And how can I give something back?
Content of these building stages is free to follow and use for building your ovens. The information is published here to suit the needs of my site's visitors. This is my way of sharing it with you. Happy? I bet you are.
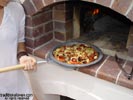
Baking bread in the oven next morning.
But hey Rado, this sounds too good to be true mate, .....you know? So, what do we need to do to get hold of the CD or download with all the details for making a wood fired oven?
Several options, read the 3 steps below.
Step 1
To post this WorkShop on CD-Rom to you, in a protective CD-mailer, including postage charges and the CD itself, it cost me:
overseas -  6.50
6.50
within Australia - 5.00
I need you to cover my expenses by sending some money, with your postal address, to my address below. Before you do this go to step 2 for other options. If you think I am crazy, you haven't gone through step 2 yet.
Step 2
Tutorials on, Wood Burning Ovens through this website is my true passion, I give them freely for anyone on this planet and beyond. Maybe you reckon that it would be a good idea to support the operation and development of traditionaloven.com website. If you are so moved or inspired by it, please add some extra money as a donation or get me something from my wish list. A contribution is certainly not required, but it would make me very happy.
About this website: I've put an immense amount of work into this subject, and this really helps me feel like the web site's content and its existence (and unconditionally free and open source availability) is valued.
Plus, donation— 25 minimum or anything on my wish list—will get you the CD with the building WorkShop Log additions** and at your request your website URL will be added to the Donor Site List. Your link will be seen by hundreds of people a day*.
(Supporting with 30 bucks automatically posts to anyone in addition also my second and the third/newest Masterly Tail oven design (MTo) ← (high quality designs with heaps of details). Work on the MTo's firebrick part design plus ALL of its non refractory features is rather popular among oven users, builders and chefs. I am making MTo's pages during evenings they're not finished yet due to increased number of jobs but around the web notice numerous MTo structures and it's how you can build the oven on your own. And for consulting on related building matters or for sharing pictures you are of course most welcome to email me (if you had e.g. special decoration, modification, personal and unique project questions.)
* Download Option (via Internet)
Download option is preferred. At the minimum I check transfers in the morning and evening hours, often also in-between, every day. While at PayPal simply type a message for me "I prefer downloading it" or "email me the download links" or anything along the lines and I will email it back promptly -> even if you do not type any note for me it'll be prompt. For the PayPal option slide to the bottom of this page. The links are being emailed to people each day
Secondly; In the email from me, with the download links, you will find my further thanks.
Overseas builders /G'day/
For the PayPal option slide down the page. I'll be charged a small currency exchange fee but it's not so bad. Please no overseas cheques nor money orders (banks here charge 10 bucks bank processing fee per each foreign check deposited. I know, sometimes the world is still too big.)
Aussie builders /how-r-ya/
Personal cheques write to "KangaRado Hand" (it's my company). For Au. net transfer option or direct deposit at Commonwealth Bank branch here are my bank account details. If you prefer PayPal option then slide to the bottom.
* Mailing Option (via AirMail Postal system) ...
... is of course still normally available. I have been packing and shipping the disks by myself since May 2003, starting with the 1st and gradually adding 2 new designs. While at PayPal page you can simply type in a message for me "I prefer mailing it" or "ship it to my postal address" or "ship it to us Mate" or something along those lines, in provided message-text input field, and I will pack/send it to your address promptly. And of course I will need the shipping address too ;-)
For those builders who send order by mail, my postal address is at the bottom of this page.
Step 3
After using the PayPal option below, or after dropping the mail in the post for me, 'lay-back' relaxed and unworried, this site is active and growing (so is the global WFO community.) You don't have to notify me about sending your order. Perhaps you'll feel like dropping me a line, and of course why not—regardless—your download links or Disks will arrive at your address promptly according to the destination.
The original MTo WorkShop contains 1,000+ long photographic sequence and the new MTo design contains 4,000+ photographs for the extra help. Every area, spot, every brick & block and angle of the building process is visually covered there in detail.
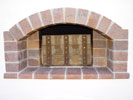
Brick oven front arch and closed oven's wooden door.
*Please note that your URL link, name/nick or email can be added onto the list only on your request for me to do it. I also reserve the right not to list names, sites containing words, material I consider to be inappropriate here (pornographic sites, hate speech, etc.)
**Additional if in need:
For those who for any reason cannot buy all the materials, don't worry;
If for ANY reason you would like to know what other materials can be used to build the wood ovens, in your letter or note just mention to me "The Equivalent Materials and Sources with Photographs" and it'll be included for you on your CD-Rom or in the link with th efirst folder. E.g. I suggest the heat insulation I use which is much cheaper and easier to get and has better properties than Vermiculite. The same for fireclays sources for making mortar and the sand-clay bed. Or similar materials to replace firebricks to construct a strong dome, more insulation materials, refractory mortars, there are a variety of options. In the description of my CD content above I mention a trade secret heat insulation, guess what's bizarre, only a few people ever asked me for it. One of them sent me a present, all the way from Tasmania.
Old masters 'wood brick oven craft-ers' used it and now it's forgotten. Ovens built by them a long time ago still bake breads or make pizzas. There are several pictures of such ovens in the 'Ovens Photo Gallery'. Refractory cements, untested like many new health remedies, were not around in those days.
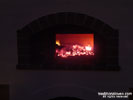
Brick dome with hot red embers and walls white for pizza.
This building guide will help you to build your high quality ovens. Everything you need is in it, you'll know ahead of time clearly what to do for each building day or stage. It will get you up and running in no time.
Please use my postal address for any mail for me:
Rado Hand
PO Box 349
The Gap, Queensland 4061
Australia
phone: (07) 3300 0048
overseas callers: +61 7 3300 0048
Salami pizza; in less than 2 minutes fired in brick oven by hard wood.
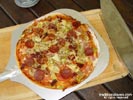
Some salami and zucchini lots of mozzarella.
Thank you and,
Enjoy.
Rado
![]()
Hoy, sliding today, ... aren't we?!
PayPal handles the transfer for you free of fees, basically I pay those. You will have option to write me a short note in a text box. Your message will be attached in the email for me (e.g. "Rado, we will email you a photo of our wood oven when cooking." etc.), write in whether you want to download everything, or include your shipping address!
* I will replay promptly with my confirmation email which will include the download link(s) OR info about the Cd's being posted to you (plus, of course, my further thank you!).
** If you'd like to make any changes - you can also reply to your confirmation email from PayPal, that will have my recipient email address. Thank you very much.
|
US Dollars |
Australian Dollars |
Canadian Dollars |
|
Euro € |
Pounds Sterling |
New Zealand Dollars |
Yen ¥ |
With my PayPal Business Account I can very easily send or accept payments online. It makes posting CD's faster. No need for you to register with PayPal to send but for receiving CC's payments or to become a merchant the best are Premier (personal) or Business accounts. They are free and easy to set up worldwide, connect for electronic transfers with your own bank account, and include tools for quick website implementations (or in email), and they are safe for managing any business.
Why should I give something back (some may ask)?
These are those original plans, and with the newest design added, for building wood burning brick ovens (which can be seen around and on the web in great numbers), being mailed out to people since the year 2001, for baking breads or cakes, roasts and pizzas, dehydrating, entertainment in your own home backyard, garden, and for business activities.
"... if you can help me shoulder the cost of running the site ..."
I am not trying to use the "open source" model to secretly sell stuff -- and I reckon I am a very honest person so I assume -- it is alright to say what I did.
Very good but it is difficult for me to have a non-commercial site. I think all of us on the web now realize there is a cost for things and time.