Larger surface hearth over smaller footprint pad
Hi Rado,
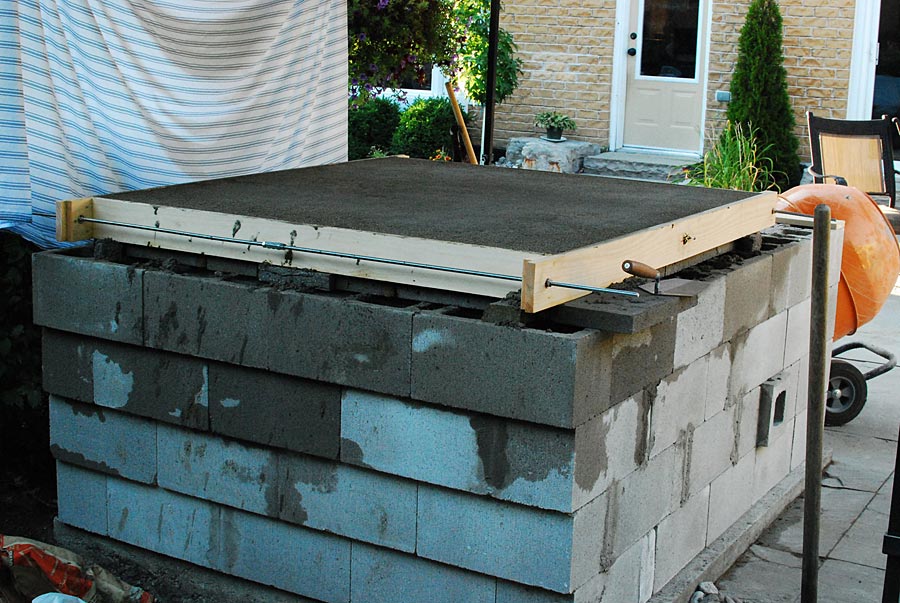
I am following up on our conversation regarding the 3G Masterly Tail oven built on a smaller Swishy oven pad size. I have now poured the hearth pad. I will send pictures of the cascading in my next email. It looks like I will make the required size within 5/8″ which is perfect.
Question 1. As I am always planning ahead, I was thinking about the dome height and the entrance height as it pertains to the 63% rule. If I look at your measurements the dome height is 16″ and the adjacent entrance arch you have at 11.5″ high. This ratio is not 63%, is there a reason for it? It is more like 71%+. Does the initial entrance have any effect on this ratio as well?
Question 2. I will be using arch fire bricks for the dome. Does it matter if I change the inner oven side wall height up or down to create a flatter roof? If so the above question is relevant.
I will finish the pizza oven most likely next weekend. I will send pics.
One additional question:
Chimney flues? You don’t put one in; Is there a reason you feel you don’t need a clay flue or stainless steel flue. Just the brick.
I have parged the inside of the chimney with 3000 degree refractory mortar to protect the brick. Do I still need a clay flue?
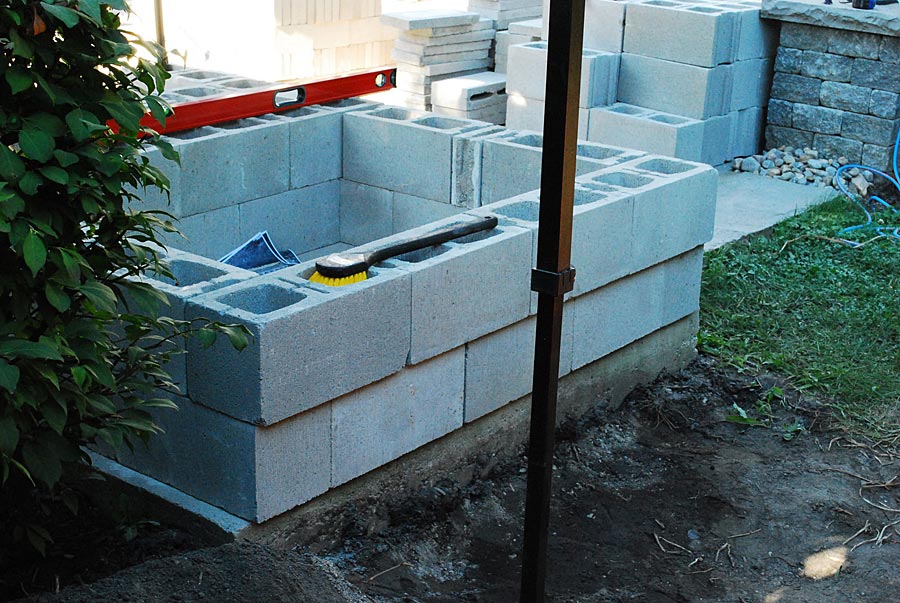
Here are two pictures showing cascading the cement blocks to increase depth of the structure.
James
—
Hi James,
Clay chimney lining or a stainless steel flues can be used. Sometimes I use them but not very often, for instance with indoors ovens with normal draft inside chimney. There is mention of this in the page linked here below, also a photo of the flue which sometimes we have manufactured by a steel fabrication company here in Brisbane North side. However, logically this isn’t really a chimney because it doesn’t have the normal chimney draft within it. The brick work is just boxing the hot air passage. It has also cold inlet towards it at the front. The passage gets hot air through upwards plus at the same time the cold fresh air from the outside, both mixed inside in the controlled space. Another function this brickwork has is that it keeps away any wind from sides and the back. Same like with the rest of the structure, the brick work on the chimney is done with brick laying mortar which has cement and lime in it. As I understand it, you had some refractory mortar left over from the firebrick part job.
The MTo design as it was built has the entrance 11-1/2 inches high. The extra 1.5″ in the height is only in the center top of the arch, whilst both sides of the arched entrance are well below the 10″ mark. It has one reason, higher pots fit into the oven. No difference is measurable in performance of the oven. The oven is very efficient and it burns fuel, absorbs and stores heat in very economically. The 63% ratio rule, for instance the accurate combination of 10″ height in the opening plus 16 inches high vault (hearth floor to ceiling measure internally), applies to rectangular shape entries with the straight top. If you look in the main original MTo design folder, there is the smaller sub folder which contains the low set oven. That oven has the arched entry exactly 10″ high. Either option is functional. The flue hood on the outside has also suggested dimensions that should be kept for proper venting.
Certainly, knowing your oven size and for it to be practical, you can make the side walls just slightly higher than those 9″ or as low as 6 inches. There is only one more-important structural consideration to make when it comes to arch size; if the oven is wider inside the arch should not have low rise. In other words, the smaller the arch span is the lower the arch rise can be made. Or, the longer the arch span is the higher arch rise should be, because wider arches are heavier. Also, for wider arches the side walls must be structurally well supported.
Rado
—
Cascading cement blocks
Additional information
Hi Rado
I very much appreciate you taking the time to respond to my request.
Here is my dilemma, Back in 2007 I had the landscaper pour the concrete pad and footings based on your Swishy design(79.5″x65.25″). Given this, and I also want to have an exposed decorative brick look on the outside of the oven, do you think that I can modify your 3G MTO design to fit the smaller concrete pad? If not I will have to go back to your original design. For the Swishy design I cannot find the original additional instruction and material files.
Notes for your interest:
- Most of the nicer decorative bricks in Ontario, Canada are 257mm x 90mm by 79mm high called MAX brick size.
- Cinder blocks come in 390mm x 190mm and 390mm x 140mm.
- Footings in Toronto, Southern Ontario should go down 4ft.
- Climate: Winter -15 to -30 Celsius, Summer 25 to 35 Celsius.
Thanks James
—
Hi James,
Yes of course you can fit the 3G MTo design on the existing slab. The new design is less wide so there it is fine. Although it’s longer but this many people worked out by cascading the back wall backwards; each block level at the back extends 1 inch backwards till the slab level is reached. This way you will not need to dig down those 4′ at the back to prolong the ground slab. Also, this oven can be build out of house-bricks instead of the blocks very easily. It’s perfect for your climate. Ah, we have also 390x190x190mm cinder blocks (the large size).
Thank you,
Rado
—
Hi Rado
Thanks for the suggestion and files. I sent through a donation to acquire all the files again including the 3G design. Kindly email the plans’ links, thanks.
3G Cascading Question:
Regarding your suggestion about cascading the back wall, if I cascade 1″ each time I will only gain 4″ by the time I reach the slab level. I will be 4″ short to follow your current design. Should I make the slab and dome 4″ shorter to accommodate this? The 1″ cascade is that the maximum amount or could you go 1.5″. I am sure the max length and angle of cantilever(cascade) should be limited based on the weight of the above structure. Also with cascading I will need to fill the 1″ spaces created on the cinder block wall sides. What would be the best way to fill them? Mortar the wall joints 1/2″ over two blocks or so.
3G Cladding Question:
Cladding the cinder blocks for the 3G design, is brick veneer a good option for cladding the pizza oven. It is usually 1-1.5″ thick but looks like brick once completed. Would the mortar coat that attaches the brick veneer hold up to the heat in the long run or dry out? Also, could the narrower cinder block be used to build the slab base in combination with a traditional brick similar to the Swishy design.
3G No Cascading Question:
Could the size of the 3G slab and oven dome be modified smaller if I did not cascade the cinder blocks?
Swishy Design Question:
Because I have to rework all the dimensions of Canadian brick sizing do you think I could modify the old Swishy design and incorporate some of the 3G design elements like the thicker insulating pad etc. in order to build it on the existing Swishy size pad? Because of the different brick size I have to custom modify all your dimensions anyway?
Last Question:
There is no mortar placed under the first row or subsequent cinder blocks for the 3G or Swishy design, correct?
There is mortar placed under the decorate clay bricks in the Swishy design between the first row of bricks and the cement pad, correct?
James
—
Hi James,
Sorry for the delay again, I am writing you from a local c@fe that we can sit in here.
Yes of course you can modify the firebrick part, however this could be thought of after the slab is in place, because there might not need to be any modification. But yes, the 3G MTo firebrick part can be adjusted in dimensions very easily just by moving the firebricks around. The brick veneer sounds fine, why not. It is 1.5″ thick but that can extend which would be nice (especially if you flush the blocks w/ slab – read below, it will fit practically and effectively.) Actually, many people used house bricks only, and stones also, instead of the cement blocks. If you have the bricks already then use them instead, of course, just keep walls dimensions for the structure as if the blocks we used. I mortar house bricks onto the ground pad too, same like brick to brick. Blocks are simply dry fit onto and next to each other then filled with 4:1 strong concrete like when they build water dams for example (strong approach this way.) With the dry fit blocks work progresses faster as well. Yes, there were a couple of MTo’s built on the Swishy oven size pad. How? Read the information below.
You could fit the MTo I emailed you on nicely. The slab for the 3G MTo; If you push the blocks flush to the back and front of the slab you can gain there 4 inches plus. Still short ~ 4-3/4 to 5 inches. The hearth slab can be pushed backwards 1/2 inch gaining a bit there again. The 4 first block rows might be step up towards the back – each block on top will be set as in a cascade extending 1 inch backwards. Or perhaps slightly less like 3/4″ could still work.
If a little was still missing after this, you can comfortably take off a bit from the depth in the pot resting surface area just in front of the oven as it’s spacious there in depth too (take this option though only in the worst scenario, but there is a nice space available!)
The cascading could be rendered afterwards into a nicely flat back wall with cement mortar whenever nicer cosmetics were important.
Ah, just more thoughts; heaps of room can be saved in the back wall above the hip level if it is made out of some thinner material, like metal, or a nice corrugated iron sheet or cement board instead of the thinner concrete blocks. A few ideas popped in my head as you can see.
And the extra width – build the walls wider to fill the whole slab right from the first raw of blocks. With the same internal part you will have some extra room for insulation around the oven in sides, plus better area for making a cover. It’s easier when the side walls are further apart, not too compact as it was originally built – for work on the roof it gets better angle due to the extra space.
You can do this easily. I am glad to have the chance to think about the oven in these additional terms. Please email me photos from you progress so I see it, together we can chat about it as well.
Respond to the Larger surface hearth over smaller footprint pad article:
No Comments
No comments yet.
Sorry, the comment form is closed at this time.