Ground moisture insulation behind this oven
Hi Rado,
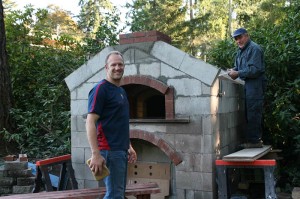
We finally finished the brick oven & It’s a beauty! Thank you again for all your help. The internal cooking part worked out very well with my special firebrick size. The hood draws fumes out perfectly.
We tested it by making some pizza’s last week and they were delicious! Once the door is complete I’ll be testing out recipes for bread and slow cooked turkeys – just in time for Thanksgiving season over here.
I have a couple questions though I’d like to run by you first though. Since this oven is recessed into a raised garden bed about 16″ deep around the back and sides, I wonder how should I protect the oven from the water around the base? Would painting it suffice? Or do I have to insulate the walls and seal them against the seasonal elements as well?


As you can see there are still a few detailing finishing touches to be done. My father inlaw has been helping a lot lately. He loves this type of work too, so most of the time I’m rushing around just trying to keep him supplied with materials!
It has been very fun & fulfilling too, to work on this. As always, I’m very grateful to you personally for all your help. I could write so much about this project, but for now let me describe a little about the materials we used.
My original fire brick is the size you mentioned; 9″ x 4.5″ x 3″/2.5″ tapered. They must be a special type of fire brick because it was very difficult to cut no matter what we did! The other type we used for the front arches are the standard ones sold at a building materials supplier called Mutual Materials. They’re 9″ x 4.5″ x 1.5″.
My brother is excited about taking on the role of making a lightweight door with a thermometer in the front for the oven. He’s been looking into insulation and so far he’s sort of convinced about using Calcium Silicate and filling some sheet metal to fit the entrance.
I really want to test out the oven already as it is now! Hopefully, I’ll be able to make a full delicious dinner for my inlaws before they head back home.
It was a fun project for sure. Maybe a little hectic juggling a family life but now that it’s almost done, I sort of miss getting out there and work on the oven. Learning about the cement mixes, bricks and blocks and all other details was really enlightening. Now, I guess, I will look forward to building a cover outside to enjoy all the oven delicacies we’ll be making with family & friends!
As for myself, I’ve been in the bio tech science scene for 10 years now & fortunate to have been with the same company called NanoString for as long as they’ve been around. Although you won’t hear or see anything about me on the website. I just work in the R&D lab.
I should also acknowledge the others that helped move this along as well. My brother, Bassim (with the pizza peel putting the 1st pizza in the oven), is a ER doctor with the mind of an engineer/architect. My father inlaw, Miguel, has done like all our fathers have, a lot of stuff in their lives, but he especially had some background in tile & brick laying from growing up in Spain. I’m still unsure how he knew so much about this stuff! And of course, my wife, Rosana, for helping it come to fruition through helping me think about the project and juggling our two kids, Zayn & Kaiden. Who both always always wanted to help with the cement!
I will try and group all the pictures of the process and send them to you. Maybe even with a spreadsheet of material & costs, if I manage to tally up all the receipts. I only have a few latest images on me right now that I will attach but more are to come! Of course, there will always be an opportunity for more pictures. Especially, since it still has to be painted. When that gets done I’ll send you a few nice shots of it.
Best,
Naeem
Respond to the Ground moisture insulation behind this oven article:
5 Comments
Sorry, the comment form is closed at this time.

Hi Naeem,
Thank you for sending the current photos, great work by all means, great Team too (maybe they want to see this page.) If you send me the material you mentioned; photos, material quantity and the costs, it would be absolutely wonderful!
Even though these blocks cope fine with moisture, to protect the set in walls from water and to keep clean some final wall render or a mosaic, paint, etc., just apply any solid masonry insulation. In paint or sheet form, all the way down overlapping the concrete slab, covering the walls at the back and sides up to the ground level height. But just a quick and simple approach. It will be enough to separate them from the ground when it gets wet. Then fill the space in between the elevated ground and the oven walls with little bit of stone gravel drainage. This gravel can be raised an inch or two higher above the insulation. It is positive to simply spread some stone gravel e.g. foot and half away from the oven, because when rain hits the ground the walls around the bottom won’t get dust or soil-dirt stick on them.
By Rado
My father in law wanted a horno oven, beehive/cob, traditional Mexican adobe oven. One of his brothers recommended using bricks and I jumped on the chance to build a brick oven I’ve always wanted to.
By Carl
Paint the foundation with foundation sealer. It is used for waterproofing basements. It is also a cement based sealer so it will bond well the block. It comes in two colors grey and white. Use white to see if you covered the block. Then grey and then white. After that you can place a french drain with a sock on it. Then cover it up with soil. It will be waterproof after that.
Look for a building supply place that sells rebar and concrete supplies. Some names of the sealer could be… ThoroSeal or Acryl 60 or Ames’® Block & Wall™ sealer.
Patrick
By Patrick Mulroy
Patrick,
Very thorough directions on waterproofing it!
By Rado
Would it be possible to forward my email to Naeem so I can check out his oven. I also live in Seattle and am planning an oven from your downloaded plans. Thanks, Greg Moring, Seattle
By Greg Moring