The original MTo design by Rado Hand
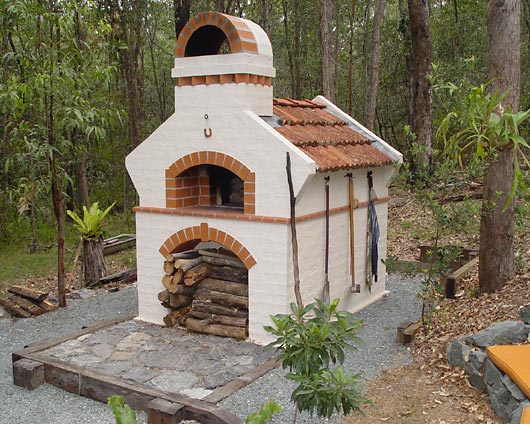
The original Masterly Tail pizza oven (MTo) design is created and built by Rado Hand in Queensland, Australia.
This specific structure shown on the image was built by him in year 2004.
Respond to the The original MTo design by Rado Hand article:
4 Comments - post your thoughts
Leave a comment
You must be logged in to post a comment.
Hi Rado,
Are you able to clear something up for me?
In the information you say not to use refractory mortar in thicknesses greater than 6mm or 1/4 inch.
What is the mortar mix to use for the dome for joining the bricks as it is thicker than that, and also what mortar to use or is it concrete that the broken pieces of pottery are embedded in around the edges.
I have purchased refractory mortar called Shirabond 35. Do I use this for joining the bricks in the domed ceiling?
Also the refractory bricks that I have are 230 x 150 x 75 in dimensions (in opposed to standard 230 x 115 x 75 size). So I will need to cut the side wall bricks to 115 wide. However will it be alright to leave the ones for the Floor and dome at 150 as it wont interfere with anything ??
Sorry about the questions, as it is the first time at attempting masonry work. {but I could build you a bridge as that is my trade }
Thank You
Wayne
Workshop Manger
By Wayne
Hi Wayne,
I assume the Shirabond 35 is a premixed air-set mortar. What you could do with this one also for aches, if you already have it, you can apply it in the arches say to 1/4 or 1/3 of the joints and later from that point you can use the fireclay/sand based mortar which you can mix at home with: sand (brickies sand), fire clay, Portland cement, lime – Parts ratio 10 : 6 : 2 : 3 ) pushing it into the “V” gaps openings. Or you could still later continue with the same industrial pre-mix but you would need to wedge it due to the larger thickness or at least press firebrick fragments into there to reduced the amount of the mortar thickness. The less water in the better as there will be smaller shrinkage on agent curing.
You can use the mortar between firebricks in walls as well if your firebrick dimensions varied slightly.
The red clay tile fragments or firebick pieces (either soaked in water before use if the mortar is fireclay based) can be used to replace the skew bricks. I always use the same mortar recipe as above. Basically there need to be many of these fragments, again so the mortar thickness is small. In here you can use also the industrial refractory mortar in the same way, densely many fragments pushed in. (or cut your own 6 skew bricks to fit in these sides)
*** Where did you buy the 230mm x 150mm x 75mm firebricks and for how much per brick??? Or did they come from being installed somewhere before. Which oven do you build, 3G MTo or the original MTo design? I reckon you didn’t know that the size of bricks will be bigger by this much or you would otherwise add the extra to the total width of the structure. Sure you can use these brick anywhere!
Can you email me a large photo, close up – sharp, of one of these firebricks? If you could simply attach the raw photo into an email for me. I will try to view your pdf’s elsewhere, on my compic they open but nothing is in them.
I looked at your website, I am sure you could design and build a proper bridge!
Good vibes,
Rado
By Rado
Hi Rado,
The fire bricks I bought as rejects from Shinagawa Refractories here in Unanderra. They were for a furnace in B H P Port Kembla. Lucky score only $1.00 each unfortunately there were only a couple of pallets.
The bricks are Pyrophilite heat bonded at 1200 degrees.
If as you say I can cut skew pieces to support the 1st brick of the arch in each side and only use a minimum of grout I will do it.
I will take a photo of the brick this weekend and send it from my wife’s email.
As you said if I had known the size of my bricks ahead, I could have made the base larger.
I could bolt a Steel angle around the Besser Block support, and re concrete an edge beam to make allowance for the extra width of bricks { here I go again, can’t do any thing without putting steel in it }
Will surely be asking more questions as we go along,
Thank You
Wayne
By Wayne
Hello Rado,
I tried to post this on the flue page, but the CAPCHA code didn’t work.
I hope you can clarify the following for me (I’m new to all of this):
“depth-measure of the hood box! It should be minimum 13″ – 33cm internally (13 inches and deeper. 15″ – 38cm ideal in indoors ovens). “Deeper”, which is the length between the inner side of the front facing wall and the oven entry point.”
Is the “inner side of the front facing wall” the inner side of the Front Arch Bricks? or the inner side of the Second Arch bricks? as shown on your bird’s-eye-view diagram 2x_arched-entry.jpg.
Thanks,
Ken
By Ken Beesley